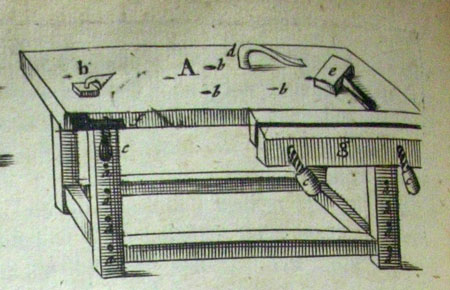
 In the past few years what has become to be known as a "Moxon Vise" has become a pretty popular workbench accessory. The basic theory behind it is that lots of joinery operations, especially dovetailing, need to be done at a higher bench height than a typical bench - which is usually set for planing operations. In Moxon's engraving from Mechanick Exercises(1678) the vise is placed at an obviously incorrect position, with no way of attaching it to the bench. Felibien, in an earlier book, (which Moxon liberally copied from) shows a group of these vises hanging from a wall behind the main workbench. In the past few years what has become to be known as a "Moxon Vise" has become a pretty popular workbench accessory. The basic theory behind it is that lots of joinery operations, especially dovetailing, need to be done at a higher bench height than a typical bench - which is usually set for planing operations. In Moxon's engraving from Mechanick Exercises(1678) the vise is placed at an obviously incorrect position, with no way of attaching it to the bench. Felibien, in an earlier book, (which Moxon liberally copied from) shows a group of these vises hanging from a wall behind the main workbench.
I think it was the Lost Art Press' edition of The Art of Joinery that brought the vise back to the limelight and it is now a very popular accessory.
Today several vendors, ourselves included, stock complete Moxon vises ready for use or hardware kits for making your own. Our vise, which was designed and is made for us by the Philadelphia Furniture Workshop, has a couple of unique features, notably a cambered from jaw for ease of clamping, and handles that can be moved out of the way while working. The hardware for the vise, which was a joint design by ourselves and the PFW is specially designed to allow for wear and a lot of give in the wood. Our hardware kit doesn't include drawings for the vise because, while the PFW design is perfect for hordes of people, if you are going to the trouble of making a vise for yourself, you might as well take a moment and decide if some customization is in order. However so many people have asked us for some guidance I thought explaining some design considerations might be in order.
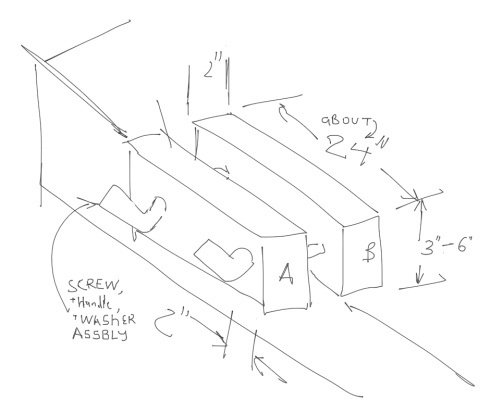 At its most simple the vise is just two boards with screws to clamp them together and enough thickness on the back jaw so that the vise in turn it can be clamped to your bench. The actual size isn't critical. The screws need to be inset far enough in from the ends so the wood doesn't split - a couple of inches at most - and the main dimension is the clamping distance between the screws and the overall height of the vise. Unless you have the urge to have several vises, you want a clamping distance wide enough for any carcase you are likely to make - say 24" max, but 18" or 20" between the screws is probably more realistic. Also you don't want to make such a heavy monster that moving it all the time is a chore. The height is the next issue - you want it high enough so it brings dovetailing to a comfortable height. 4" is fine for most people, 6" might be better for a tall person on a short bench - here is one area where personal preference is important.
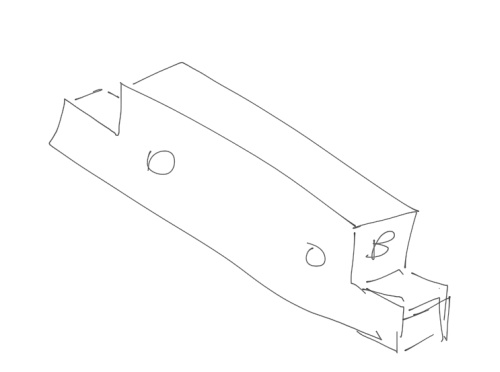 Now we are already into two tweaks. By cutting down the ends of the rear jaw into ears you give yourself clamping surfaces that will keep cutting tools away from your holdfasts - the usual device for attaching the vise to your bench.
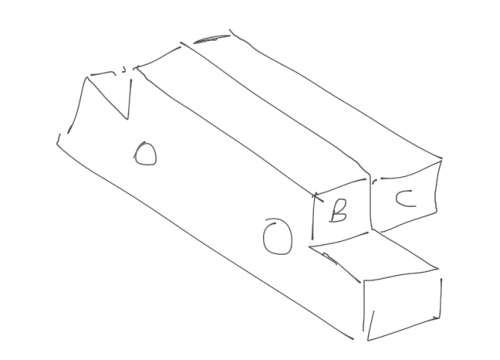 Among the innovations made by the Philadelphia Furniture Workshop in our vise - a narrow shelf is glued on the back of the rear jaw to create a clamping ledge so that you can clamp your tails down firmly when you lay out your pins.
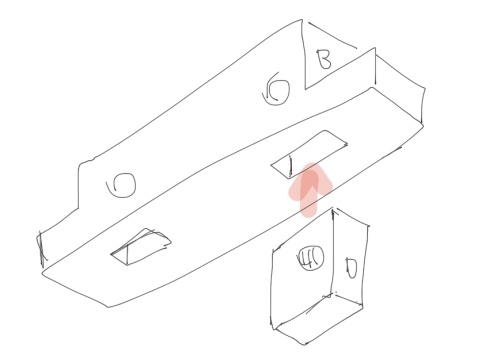 The way our kit works is that the two acme screws thread into two nuts mortised into the back jaw of the vise. Just locate the holes far enough from the bottom so the nuts have enough clearance and first drill the holes and then mortise away. The nuts we use are custom for the vise and are offset. We found that, especially with a sloppy mortise, a regular nut can spin in the mortises as the vise wears. This design gives you plenty of room for error and you won't have to worry about wear.
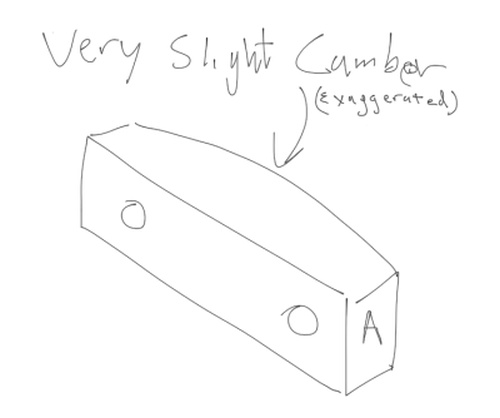 The front jaw can be as thin as 4/4 but here again the Philadelphia furniture workshop design has a great innovation. The inside of the jaw is slightly cambered so even if the jaws are tightened unevenly the vise will hold in the center perfectly. Also the thinner front jaw, not only makes the vise lighter, the jaw can bend a little when clamping for a better fit on the work.
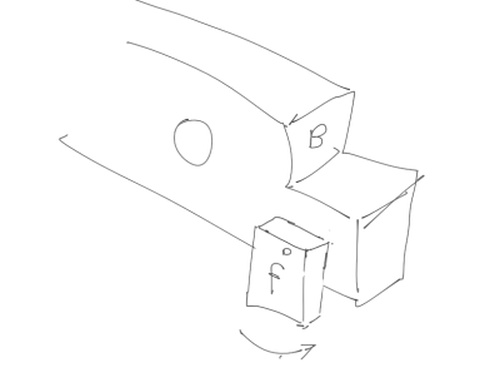 Finally it's nice to have a little something to help align the vise to the front edge of your bench.
We didn't use Moxon type vises when I was learning woodworking. What a shame. I cannot imagine not having one now. Especially since between my back and my eyesight (lack of) getting the work closer to me, and not having to slouch down to work is a real boon, Whichever design you use I think it's a really great addition for work holding in the workshop.
|  Joel's Blog
 Built-It Blog
 Video Roundup
 Classes & Events
 Work Magazine


 In the past few years what has become to be known as a
  At its most simple the vise is just two boards with screws to clamp them together and enough thickness on the back jaw so that the vise in turn it can be clamped to your bench. The actual size isn't critical. The screws need to be inset far enough in from the ends so the wood doesn't split - a couple of inches at most - and the main dimension is the clamping distance between the screws and the overall height of the vise. Unless you have the urge to have several vises, you want a clamping distance wide enough for any carcase you are likely to make - say 24" max, but 18" or 20" between the screws is probably more realistic. Also you don't want to make such a heavy monster that moving it all the time is a chore. The height is the next issue - you want it high enough so it brings dovetailing to a comfortable height. 4" is fine for most people, 6" might be better for a tall person on a short bench - here is one area where personal preference is important.
 Now we are already into two tweaks. By cutting down the ends of the rear jaw into ears you give yourself clamping surfaces that will keep cutting tools away from your
  Among the innovations made by the Philadelphia Furniture Workshop in our vise - a narrow shelf is glued on the back of the rear jaw to create a clamping ledge so that you can clamp your tails down firmly when you lay out your pins.
 The way
  The front jaw can be as thin as 4/4 but here again the Philadelphia furniture workshop design has a great innovation. The inside of the jaw is slightly cambered so even if the jaws are tightened unevenly the vise will hold in the center perfectly. Also the thinner front jaw, not only makes the vise lighter, the jaw can bend a little when clamping for a better fit on the work.
 Finally it's nice to have a little something to help align the vise to the front edge of your bench.
here you go:
https://toolsforworkingwood.com/store/item/MS-MOX.XX