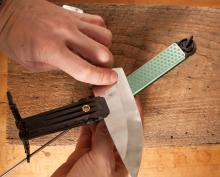
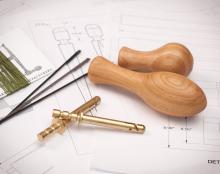
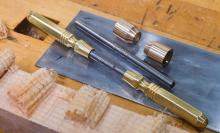
- Main
- Kit Instructions
- Care and Maintenance
Everyone loves a sharp knife, and Ron Hock knows sharpening. In fact, he wrote the book on it. Hock knife kits are a great way to make a set of custom knives that will be instantly appreciated, and one of a kind. All the metal work in these kits is already completed. The heavy 1/8" carbon steel blade comes wicked sharp and ready to slice, just as soon as you design and build your own custom handle.
Building a knife kit is fun and has the sweet pay off of producing a useful kitchen tool. The handle scales attach with epoxy and steel plugs. The plugs are included in the kit along with full instructions to lead you through the process step by step (or click on the "Instructions" tab above). The handle material is up to you. Use a piece of treasured wood scrap, or purchase a set of black micarta handle scales for a more modern look. In the Gramercy Workshop we've built up kits with metal handles too. No matter your handle choice sharp knives are a pleasure to use, and using one with a custom made handle is a real treat.
Hock Knife kits are available in 4 designs. All include a VERY sharp knife blade, 3 steel handle plugs, and instructions for completing the kit. You will need to supply your own epoxy, which can be bought at any hardware store.
Hock Knife Kits are made in France.
Recommended tools:
- Drill press with 1/4" bit
- Bandsaw, jigsaw or coping saw
- 2 or 3 Clamps (C-type or spring)
- Belt sander (or rasps, files, & sandpaper)
You will need:
- Two pieces of knife handle material approximately 1/4" x 1-1/4" x 5"
- Epoxy (avoid the five-minute formulas)
- 1. The blade is SHARP! Handle it very carefully!
- 2. Wrap the entire blade in masking tape to protect you and the blade from damage. Put an extra piece of tape along the edge. Leave the tang, the handle portion, exposed.
- 3. Take wood movement into account when you select the material for your handle. The wooden parts of your handle, the scales, may shrink or swell with changes in ambient humidity. This instability can expose the edges the tang, and may compromise the epoxy bond. The wood for your handle should be hard, tight-grained and well seasoned. To minimize wood movement consider soaking the pieces in shellac or similar finish and allowing that to dry before proceeding. (Knife-making suppliers offer stabilized woods that have been impregnated with resin to prevent wood movement. They also offer many beautiful synthetic materials that are durable and immune to seasonal changes, such as Micarta® and DymondWood®. Orient your scales so that the surfaces you want to see face the outside. The inside surfaces should be sanded with 120-grit so that they are flat and the surface is rough for the epoxy. Mark the inside surfaces to avoid confusion later.
- 4. Carefully position one scale and clamp it in place. Using the hole in the tang as a guide, drill a 1/4" hole through the scale (a drill-press is recommended). Insert one of the dowel-pins to hold the scale in place. To help everything is stay in place, insert the pins as you go; once you drill a hole, insert a pin. Trace the outline of the tang onto the scale. Remove the clamps, flip the blade over and drill holes in the other scale and mark its outline the same way as above.
- 5. Use a bandsaw, jigsaw or coping saw to cut a rough profile following your marked lines.
- 6. The forward-facing (toward the tip of the knife) edges of the scales must be shaped to suit and finished before gluing the scales to the tang. You won't be able to shape or finish them after gluing without damaging the blade. Use the pins to align the two scales and put them together (without the tang). Use clamps or a 1/4" bolt and nut in the center hole to temporarily hold the two pieces together. Shape the scales and sand/polish them to 400-grit. At this time, you may also want to apply the finish that you plan to use to those surfaces. Allow it to dry and follow that application with a coat of wax to keep the epoxy squeeze-out from sticking to those surfaces.
- 7. Using the pins for alignment dry-fit the scales to the tang. Use tape to carefully mask the blade in front of the scales. This will facilitate cleaning the epoxy squeeze-out from the blade.
- 8. Scuff the tang and the pins with 120-grit and clean them thoroughly with acetone or alcohol so the epoxy will stick.
- 9. Wearing gloves, mix the epoxy according to the manufacturer's instructions and smear it onto the tang and the mating surface of the scale. Dip the pins one by one into epoxy and push them into the scale from the outside. Align the scale with the tang and push the pins in just barely through the tang. Apply epoxy to the other side of the tang and the other scale and position it over the pins. Push the pins into the second scale, centering them between the two scales and apply clamps.
- 10. When the epoxy is partially cured & "rubbery" it's easy to peal off the squeeze-out from in front of the scales. If you wait past the "rubbery" stage you can use a sharpened wooden dowel to scrape the squeeze-out from the corner.
- 11. When the epoxy is fully cured remove the clamps and keeping your tape well in place shape the handle. You can use files and rasps and sandpaper but a belt sander will save a lot of time. Shape the wood to match the steel and to make a comfortable grip. Do not generate too much heat while grinding! Grind the pins slowly and intermittently; a little on each, letting them cool before going back for more.
- 12. Apply your finish of choice.
- 13. Remove the tape and enjoy your new knife! Congratulations!
Sharpen lightly and only often enough to keep the best edge. Your high-carbon steel blade will respond well to a smooth sharpening steel such as a scraper burnishing rod.
Remember that this blade is not stainless. Rinse your knife and wipe it dry after each use, and never ever put it in the dishwasher. Dipping the blade in water as you slice the more reactive foods can help to keep apples, potatoes, and onions from changing color.
Over time your knife will acquire a pewter-like blue-gray patina that distinguishes it from stainless steel, and gives it that "heirloom look." If it should happen to rust, or if the patina becomes unsightly, use a bit of steel wool or some mild cleanser, such as Bon Ami (on a cork to protect your fingers) to scrub it clean.