Recently I was lucky enough to join 5 other local woodworking-inclined folks in an outdoor, socially distanced yakisugi class led by Robyn Mierzwa, founder and owner of the incredible community woodworking space Makeville Studio in Brooklyn.
Yakisugi, also read as Shousugiban, (焼杉板 in Japanese) literally translates to “burned/charred cedar board”. And it means just that. Yakisugi most likely started in 18th century Japan as a durable finish on exterior house boards and more. Charring the boards makes them more resistant to moisture, bugs and rot, and - importantly in Japan - fire. It is primarily believed to have developed in response to the thinning amounts of red cedar in Japan which had previously been used to build houses.
Fast forward to the 21st century and yakisugi has become popular globally as a decorative and durable finish (some would argue overused, like truffle oil in restaurants in the 1980’s and 1990’s, but I disagree). Deep charred yakisugi on an accent wall in your house, a lightly burned shelf in your kitchen, making the grain pop a bit on the handle of that spoon you just carved - yakisugi is a unique and natural way to elevate the aesthetic and durability of a woodworking project.
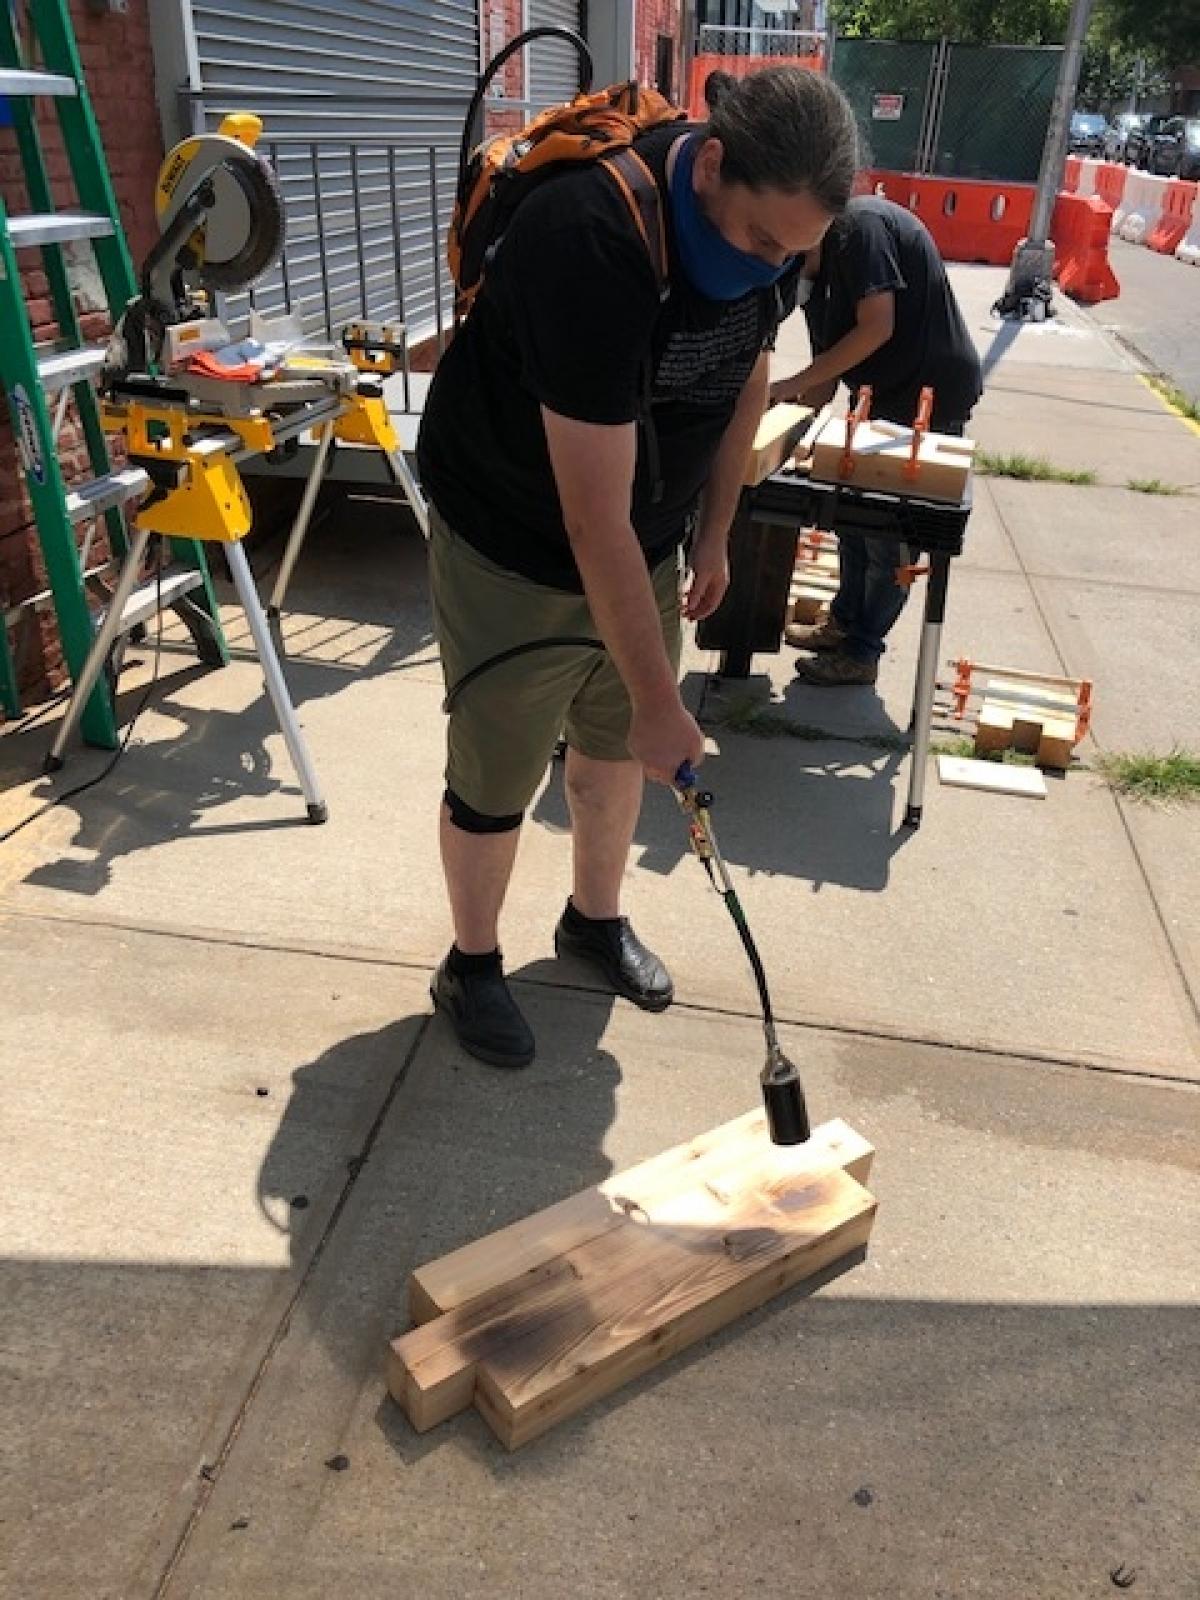
For the Makeville class we constructed a simple outdoor bench out of big-box store square lumber. The class covered measuring and marking stock, cutting stock on a miter saw, gluing up the bench, and, of course, fire. We used a small propane tank and weed burning torches, and we practiced on cedar boards to see the variety of looks we could get with different levels of heat and duration of burning. It was surprising to see the range of what’s possible.
Obviously, first and foremost, we learned how to safely use propane and the torch. Exciting stuff if you haven’t done it before. We learned how to control the flame and use a nice even pass over the wood until you get your desired burn. Some folks went with a light touch, others (including me) went for a fuller burn, passing over my benchtop until I got the alligator cracked skin look I wanted. We went over how to scrape the charred wood to remove the ash - I chose not to, preferring the more charred, less clean look. I used a block plane to give a large rough chamfer to all the edges, and will be finishing my bench with Tried and True Danish Oil. I am mostly excited and a wee bit nervous to see what becomes of the charring with the Danish oil on top, and will let you know how it turns out.
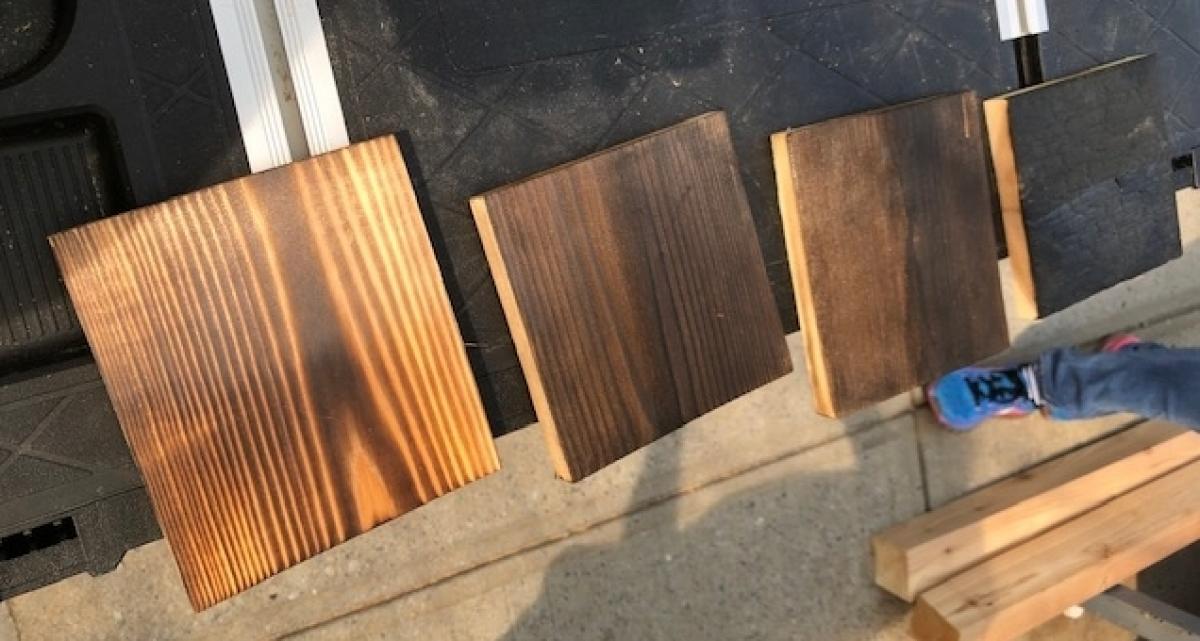
These are some test boards we made as a class, highlighting different levels of burn and what they looked like on cedar scraps
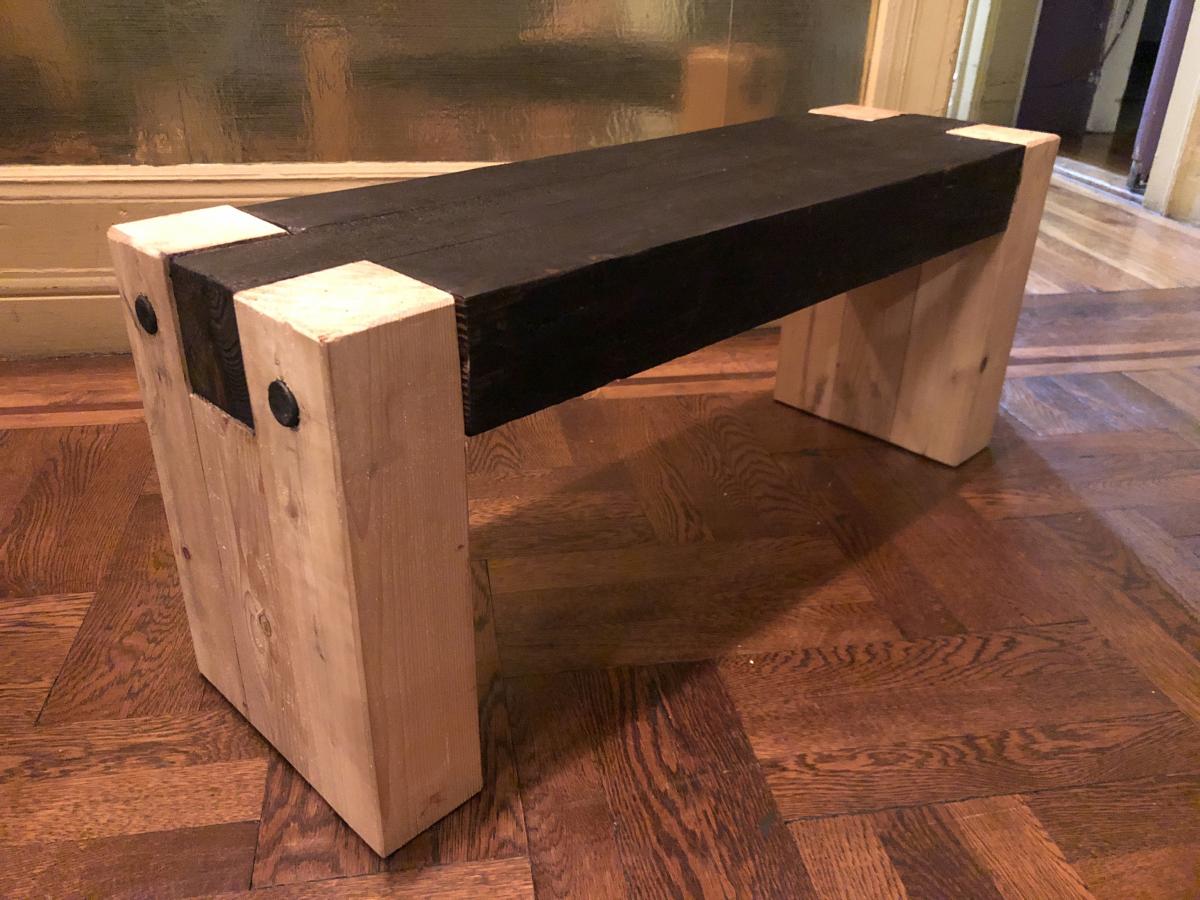
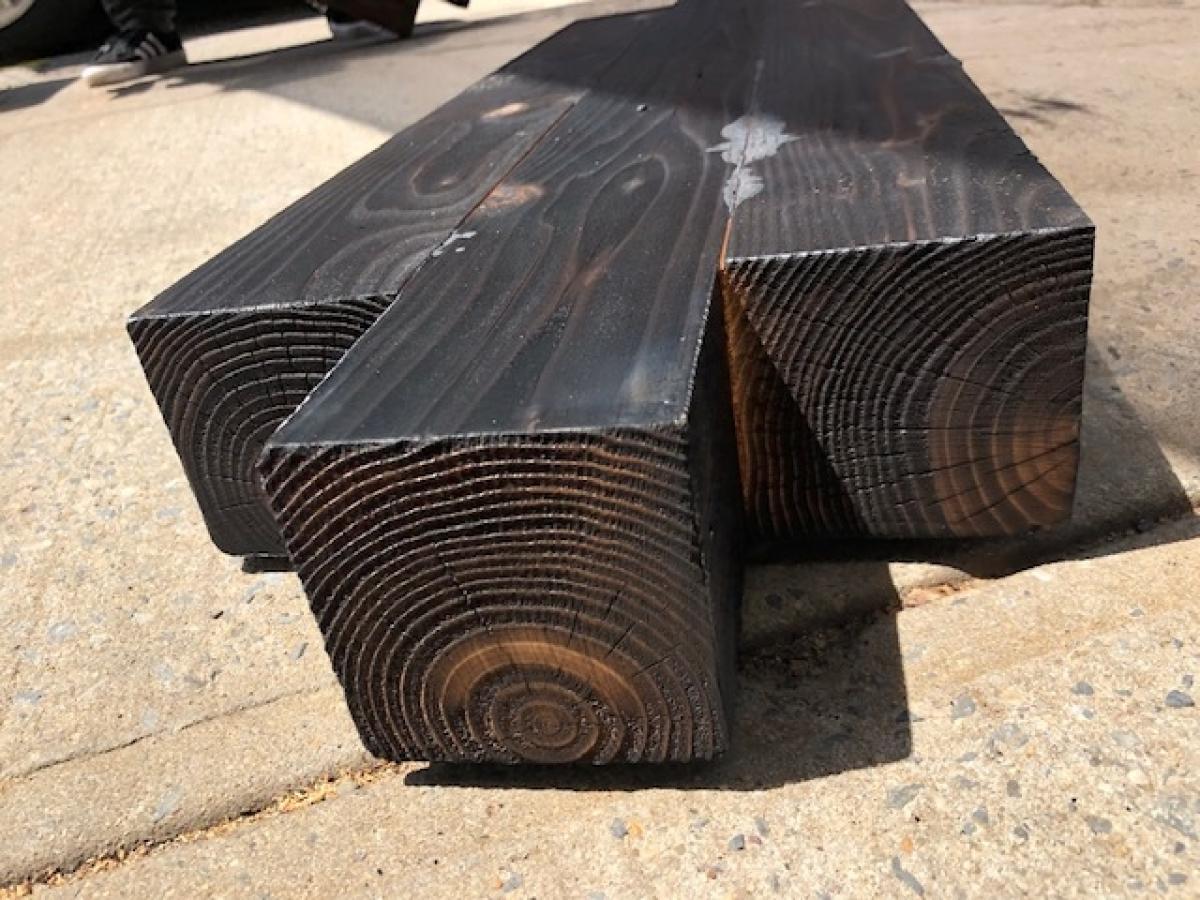
The level of burn I decided to go for on my benchtop
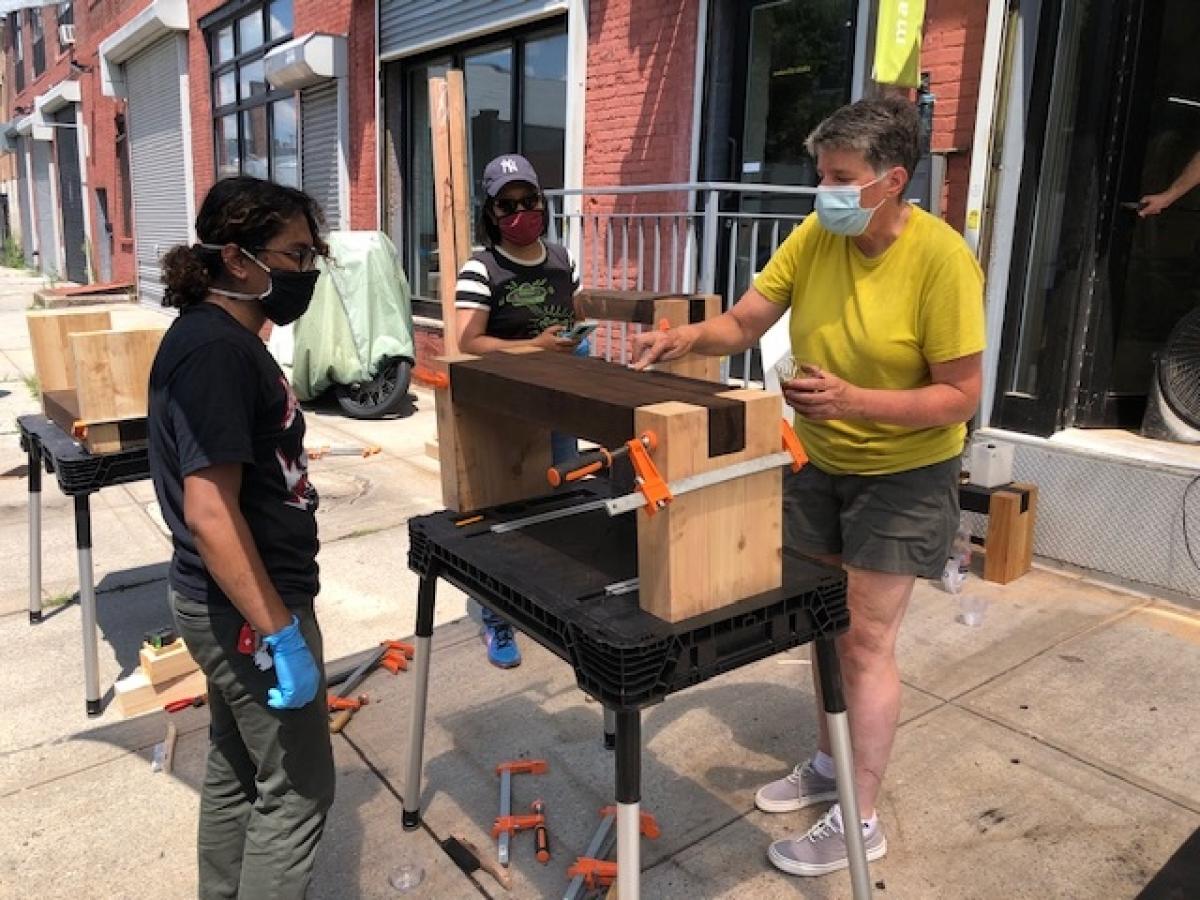
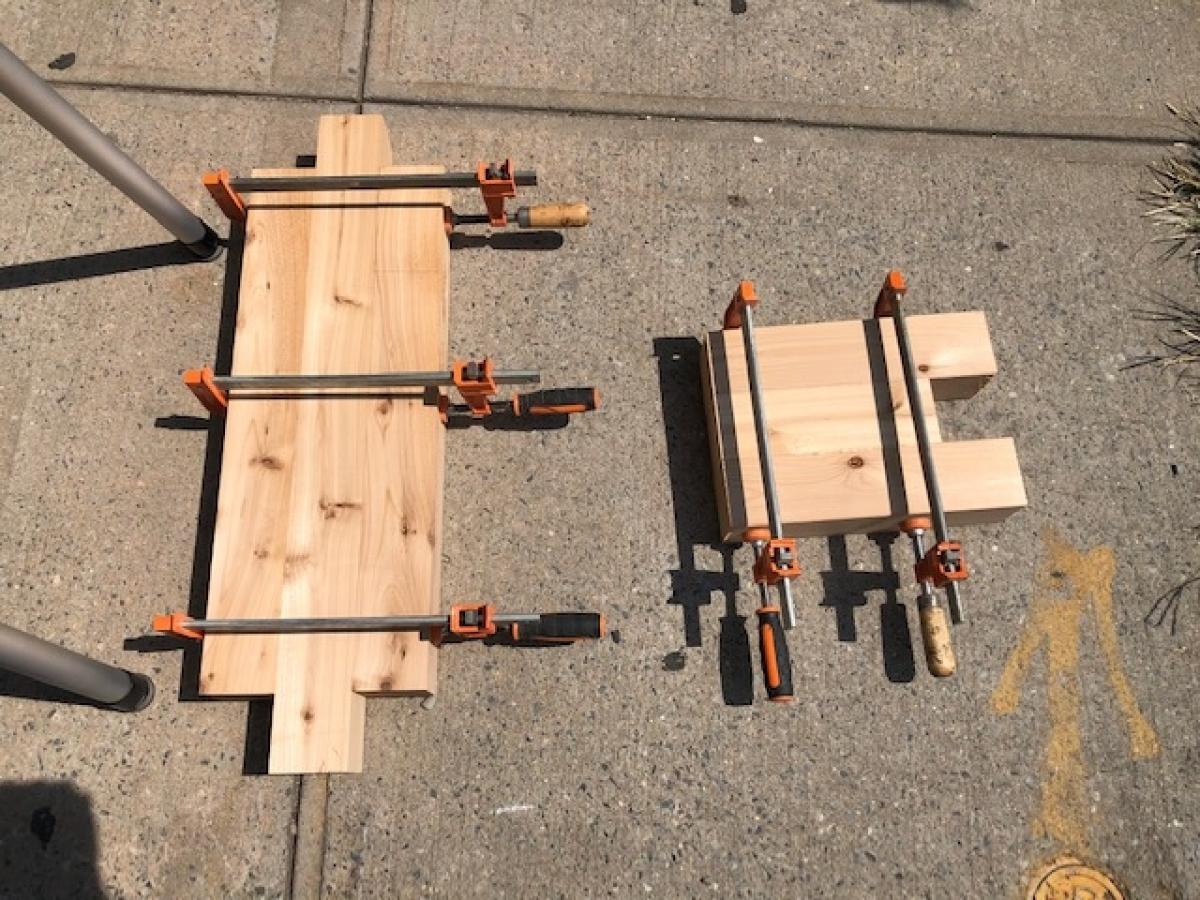
Robyn teaching different techniques for applying finish on shousugiban First we cut up and layed out the top and legs, and then glue-up prior to burning! What happens when you don’t clean up your glue before fire. Which I always forget to do. That said it was 800 degrees out even before we lit the torches. I’m blaming that. Nice easy strokes, back and forth, until you reach the desired level of burn!
Join the conversation
09/03/2020 Kerry Benton
I've done this twice now on backyard projects. I made several long, shallow planter boxes using basic (untreated) cedar fencing, which I charred and treated with a home made beeswax / carnauba / mineral oil paste wax as it's for growing microgreens. One hot Texas summer later, and they seem to be doing quite well. I'll have to empty the soil to see if i need to re-wax, but so far so good.
I'm also building some large raised beds and went with shousugiban 4x4 posts & 2x4 L posts, treated with teak oil (the posts will all be outside the growing area). The charred surface absolutely *drinks* the finish. Time will have to tell if the posts will survive burial for long enough to justify going cheap on the wood vs. getting cedar posts (at roughly 2-2.5x the base cost). I think it looks great, regardless of the rest.
09/03/2020 Joe Samalin
Kerry, thanks for sharing. I always appreciate hearing different ways of using shosugiban, and this sounds like a great one. Interested to hear how it holds up with the oil and wax vs teak oil. I know teak oil can be a lot of different things - what did you use? When I applied the Danish oil (Tried and True) I used on the bench to the charred areas it literally drank it up - disappeared almost instantly. Would love to see some pics of your work if you want to share them!
09/04/2020 Donald W Hess
The blog entry mentioned using the technique on a kitchen shelf, interior wall or utensils. For an interior piece, what can you do about the smell of burnt wood?
09/04/2020 Joe Samalin
Donald,
Thanks for the question. I think you are asking about the piece once it is finished, not the smell when actually burning the wood, yes? If so then you don't really need to worry about it. Most often you will scrape away the charring with a wire brush once the wood cools which helps alleviate the smell if any (there isn't always that much to start with), and the rest will be taken care of by whatever top coat you use to protect the wood, always a good idea with shosugiban and especially if using it indoors!
Typically a danish or linseed oil is used, and I am playing with a few other options as well. Will let you know what I find in another blog perhaps, and any other questions just let us know.
Thanks,
Joe S
09/04/2020 Rob
What was the recommended method to abrade the ash before finishing?
Thanks
09/04/2020 Stephen
I love the design and proportions. Can you please provide the overall length, width, and height.
09/04/2020 Joe Samalin
Rob,
Most people use a wire brush. The deeper you burn obviously the stronger the brush the better, but any brush should do. Also, try different things and play with it a bit! Different ways of taking off different amounts of char. Please share anything you discover that works well here!
I’ve been using this process for years on many red oak projects, which is where I’ve found the most spectacular results. I’m curious if you took any precautions with the glue lines. I’ve given up trying to glue first as it consistently fails when I do and instead “prefinish” parts prior to glueup
09/05/2020 Joe Samalin
Jeremy,
I got lost down a rabbit hole of your blogs for about an hour just now. Your work is stunning and the breadth and width of your knowledge and skills is envy inspiring! I especially love how you seem to do so much work with your kids. Great stuff and thanks for sharing. Your shousugiban is especially beautiful (especially the stools). I recommend folks here take a look at the blog link listed above in Jeremy's comment.
In re to glue, I am new enough to shousugiban that I hadn't thought of it beforehand when working on the bench, and like your idea of prefinishing. Will try it on my next project!
Thanks,
Joe S
09/06/2020 Joe Samalin
Stephen,
The bench is 34” long by 14” tall, about 10” wide or so. Can measure and get the exact width but we used standard square posts I believe from a big box store. I’m planning on making a few more of there with different dimensions and woods! Shoot us a picture if you try your hand as well. The bench is a low one, I’m in New York City so it’s currently being used indoors as a place to put planters on. Had it for a while as a low bench in the hallway too.


 Joel's Blog
 Built-It Blog
 Video Roundup
 Classes & Events
 Work Magazine
I'm also building some large raised beds and went with shousugiban 4x4 posts & 2x4 L posts, treated with teak oil (the posts will all be outside the growing area). The charred surface absolutely *drinks* the finish. Time will have to tell if the posts will survive burial for long enough to justify going cheap on the wood vs. getting cedar posts (at roughly 2-2.5x the base cost). I think it looks great, regardless of the rest.
Thanks for the question. I think you are asking about the piece once it is finished, not the smell when actually burning the wood, yes? If so then you don't really need to worry about it. Most often you will scrape away the charring with a wire brush once the wood cools which helps alleviate the smell if any (there isn't always that much to start with), and the rest will be taken care of by whatever top coat you use to protect the wood, always a good idea with shosugiban and especially if using it indoors!
Typically a danish or linseed oil is used, and I am playing with a few other options as well. Will let you know what I find in another blog perhaps, and any other questions just let us know.
Thanks,
Joe S
Thanks
Most people use a wire brush. The deeper you burn obviously the stronger the brush the better, but any brush should do. Also, try different things and play with it a bit! Different ways of taking off different amounts of char. Please share anything you discover that works well here!
I got lost down a rabbit hole of your blogs for about an hour just now. Your work is stunning and the breadth and width of your knowledge and skills is envy inspiring! I especially love how you seem to do so much work with your kids. Great stuff and thanks for sharing. Your shousugiban is especially beautiful (especially the stools). I recommend folks here take a look at the blog link listed above in Jeremy's comment.
In re to glue, I am new enough to shousugiban that I hadn't thought of it beforehand when working on the bench, and like your idea of prefinishing. Will try it on my next project!
Thanks,
Joe S
The bench is 34” long by 14” tall, about 10” wide or so. Can measure and get the exact width but we used standard square posts I believe from a big box store. I’m planning on making a few more of there with different dimensions and woods! Shoot us a picture if you try your hand as well. The bench is a low one, I’m in New York City so it’s currently being used indoors as a place to put planters on. Had it for a while as a low bench in the hallway too.
Joe S