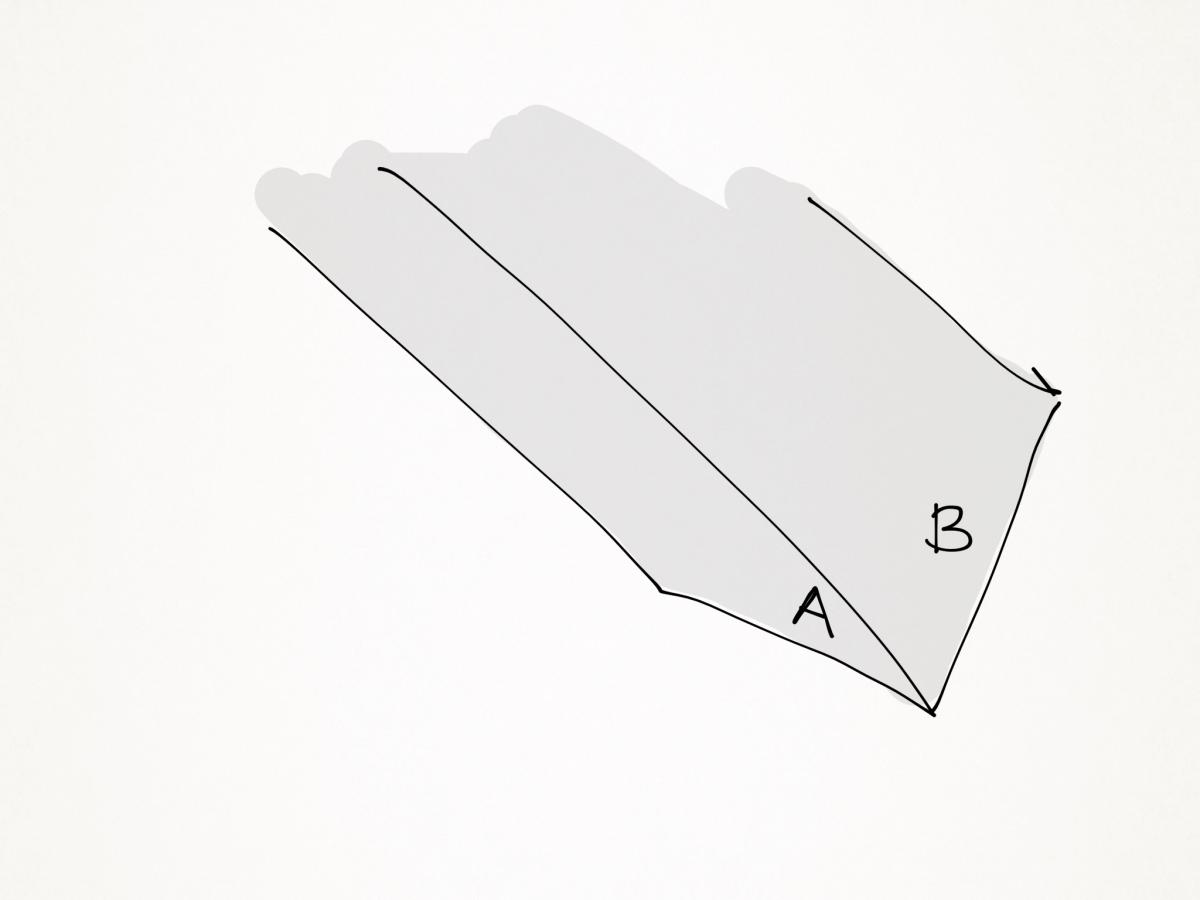
How we normally think of plane iron's cutting edge
Bench planes, regardless of which culture you come from, are typically used for two main things. The first is dimensioning stock - turning a piece of rough lumber into something nice and square with a correct dimension. This is where bench planes with multiple lengths are used. This operation has largely been superseded by power jointers and planers. Another area of dimensioning, which is still practiced all the time with bench and block planes, is the final fitting of a drawer, a door, or any mating surface to get that perfect fit - and sometimes with glued up joints, to get the parts to be glued up to fit perfectly together.
The other very popular modern use of bench planes is for a final pass over a surface to make it look and feel just fabulous. If you have a machine-planed surface, hand planing just before you're done removes any planer or saw marks. Many people believe that a hand plane surface has a tactile quality to it that sanded surface just doesn't have. Japanese woodworking often features unfinished wood beams as a very important part of the architectural aesthetic, and so a final plane finish of a big beam can be very important. In all cases of planning for a final finish, the most important thing is a consistent thin shaving that doesn't really change any final dimensions. More importantly, the planing must not cause tear out and make the wood surface worse.
Japanese woodworking has taken the action of planing to the nth degree, with competitions to see who can have the thinnest longest shaving.
The big enemy of hand planing is tear-out, where wood splinters and lifts out of the surface as you are planing. Tear-out destroys a nice surface, forcing you to either plane, scrape, or sand areas with tear-out to remove unsightly marks. In the United States, where we typically sand surface, hand planing for aesthetic reasons is less common - but even if you are planing for dimension, nobody wants tear out.
In the simplest explanation, tear-out occurs when a wood shaving is thick enough or long enough to have the strength not to bend cooperatively when the wood being planed is lifted off the surface. Instead, stays attached to the wood not being planed and pulls up a splinter ahead of the cutting edge.
There are at least three ways of fighting tear-out: planing with the grain; planing very thin shavings that easily bend away without lifting up uncut wood; and having a double iron or very tight mouth of the plane to bend and break the shaving before it has leverage to do damage.
I could spend a week just explaining what I just said (and I probably will in the future). But today let's focus on how thin a shaving you can plane.
So the question is: from an engineering standpoint, how thin can you go? Or more properly, what are the mechanical limitations of getting a thin shaving?
Let's start with the obvious. The initial flatness of the wood makes a difference. If you are planing rough wood flat, as the plane hits the valleys and hills of the material, you will get an inconsistent shaving. The thinner the shaving, the more important it is that the surface is flat to begin with if you want a continuous shaving.
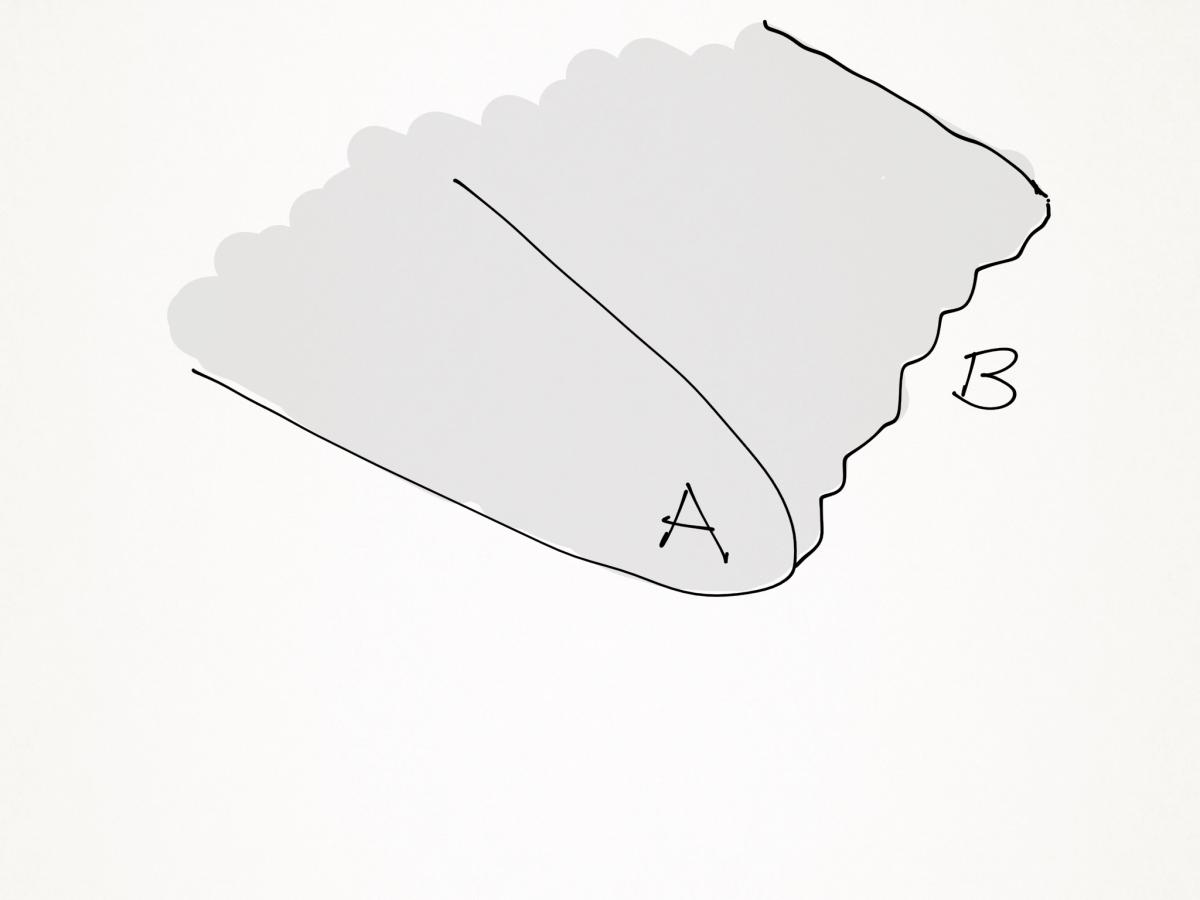
How a plane iron's cutting edge actually looks if you go close enough
You also need a sharp blade. And this is really what this blog is about.
Take a very close look at that sharpened point at the tip of your blade. Depending on your magnification, you'll see at some point it stops being a point and looks rounded. And in normal use that rounding is very small, .001" and less. Since the plane iron has width, it is reasonable to assume that unless the entire tip of the iron comes to the same level of pointiness, different parts of the blade will cut differently.
This rounding at the tip happens because of three reasons, the most common of which is wear. The second most common reason is that when the plane was sharpened, it wasn't sharpened enough to create a point in the first place. You stopped short of getting a wire burr, and you might have a mirror finish, but that tip is rounded. The third reason is that you stopped at too course a grit when sharpening. No matter what grit you used, it is fair to assume that if you created a wire edge and removed it, there are sharp points at the edge of your blade. But depending on the grit, the sharp points might be intermittent and what you actually have is a ragged edge. This means rounded gaps between the sharp points. In theory, no matter what grit you use, you will have some microscopic unevenness, but stropping can remove a lot of this. The purpose of stropping with plain leather is to remove any vestiges of a wire edge and even out the edge, so you have consistent pointiness all along the width of the blade. (This is different than stropping with honing compound, which is a very fine abrasive.) A sharp iron can cut at a very shallow depth
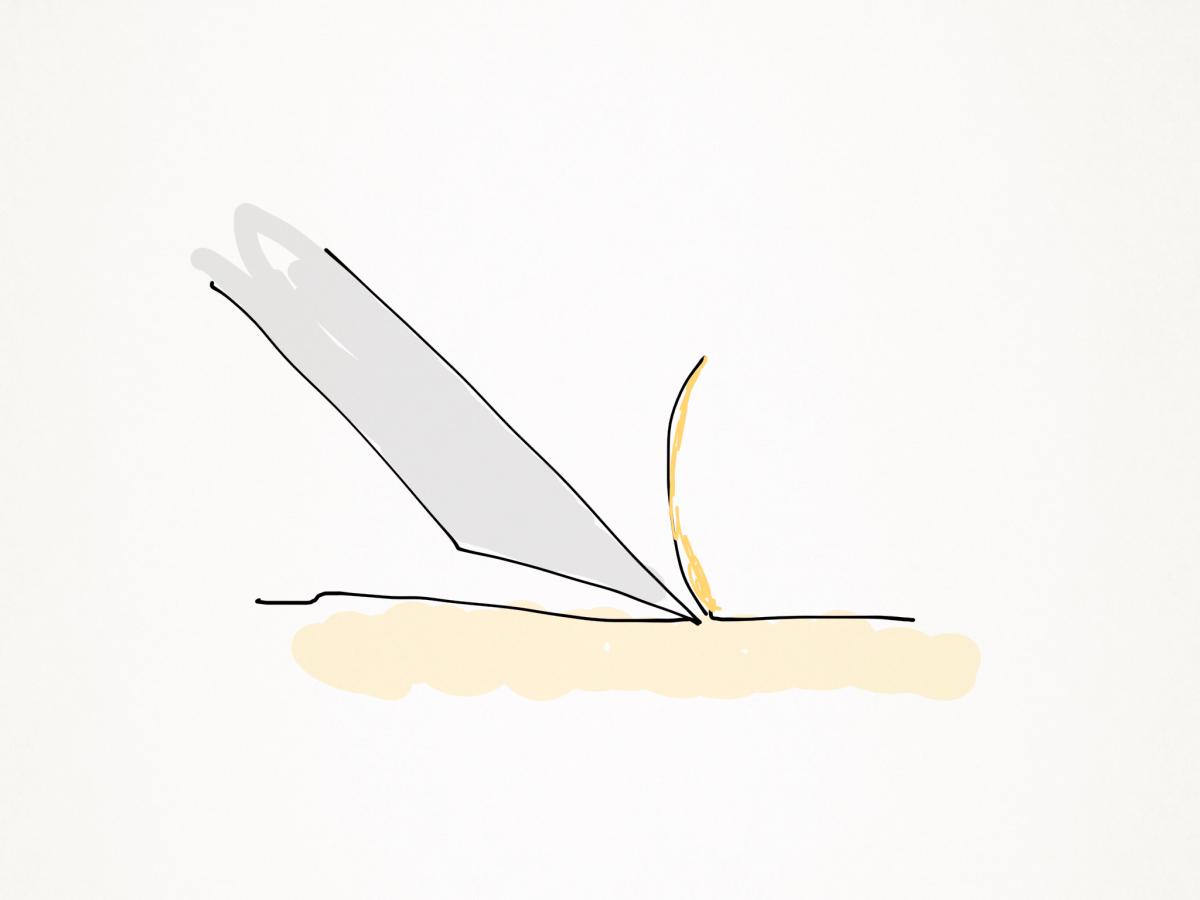
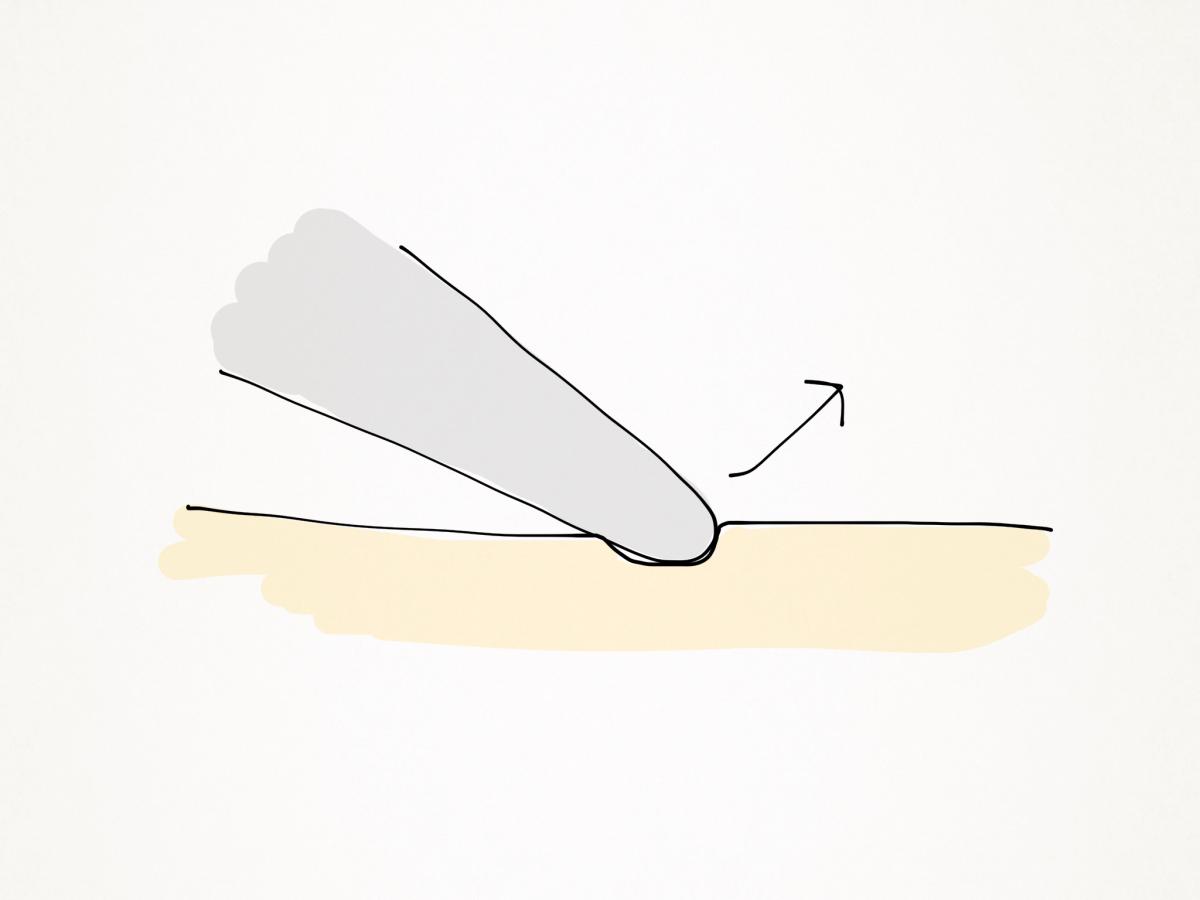
So now you have a consistent pointy edged blade and you are sticking it into the wood. Depending on how pointy it is, it will either grab a very thin section of wood and start shaving it off , or if the blade is too rounded, it will roll over on top of it. If the former: all is great. If the latter: there is an excellent chance you will increase the depth of cut until your edge is below the roundness of the tool and then you will start pushing the plane. Because you are deeper in the wood, and the cutting iron is a little rounded, you will find yourself pushing harder, with less control, and possibly unsuccessfully. You have a much greater chance of a thicker shaving that causes tear-out than you would in the first case, with a truly sharp iron. This is why a dull, rounded iron - even just a little dull, can't take a super thin .001" or less shaving, even if the plane is set fine enough. The depth of cut deep enough, and therefore the shaving is correspondingly thick enough so that the blade can stay in the wood and not roll out of engagement.
An even slightly rounded iron will glance off the material at a shallow depth. (Note: we are talking about rounding of .001" or less
If you are dimensioning wood and you are trying to remove a fair amount of material, the thicker shaving isn't a disaster. Depending on the type of steel the blade is made out of, you might find your initially super pointy iron getting rounder, duller and harder to push in only a few minutes of work. However unless the plane starts to tear-out or refuses to cut, it's fine. It's true that the pointy iron can cut a thicker shaving more easily, but a slightly duller iron still gets the job done.
If you are planing for aesthetic reasons only and you must have a super-fine, tear-out free surface and any rounding might be problematic.
Any plane of quality should be able to shave a one thousandth of an inch shaving or less. If your plane is nevertheless have difficulty doing so, consider the sharpness of the blade; the set-up and adjustment of the iron; the plane's ability to hold a setting; and how rigidly the body of the plane is supported. Next time I pick up this series, I will explore what happens with a thicker shaving and we can prevent it from lifting up the wood surface.
Join the conversation
04/26/2023 Walt Henry
This is one of the best pieces of information on planing and blade condition that I have read. Thanks Joel.
04/26/2023 Anthony McDonald
Thanks. Hope you will address the angle of attack in preventing tear out in future blogs. I have been working a lot with quarter sawn sapele lately and the alternating ribbons of grain drive me crazy and resorting to card scraping as a first approach to smoothing the surface.
04/26/2023 Deke deCastro
I'd like to hear about how straight vs. skewed vs. cambered vs. corners nicked off affects all of this too. Thanks for taking the time to write this blog, Joel!
04/26/2023 Aaron Landy
I like everything you said and hadn’t heard discussions about the relative advantages/disadvantages of a slightly rounded blade. This was very informative,
You didn’t mention plane sole flatness and where the flatness is most important. Also I didn’t hear (yet) is a discussion of the importance of technique of using the plane. Don’t angle of attack (skew), speed and downward pressure all contribute to a better cut as well?
I watch too much YouTube makers and I’ve come to suspect that even with a finely tuned plane and good technique it often comes down to the piece of wood and the luck of the grain.
04/27/2023 Thomas Walton
Just now finish planing typical rowed sapele - a job I have been dreading but freshly sharpened the Norris blade,set it shallow in trusty A15, thought of Joel,skewed the plane and...piece of cake.minimal tearout eliminated by reversing direction. Straight to 220 grit
04/27/2023 Dan Williams
I have a couple of thoughts. First, we live in a machine world and as a result our perspective is completely skewed. Wood didn’t suddenly change in the 20th century. The earlier craftsmen had the issue of tear out end no wide belt sander to make that glass smooth surface that we now consider the showroom norm. Looking at museum pieces will show that what we consider an imperfect surface today was perfectly acceptable in past times. This is not to say the cabinet makers did a poor job, in fact they had better skills and techniques and maybe more experience to produce quite exceptional surfaces, but not “perfect”.
This quest for perfection has haunted me through 40+ years of a great hobby. Now that I am able to fully appreciate the exceptional work I do I am able to enjoy this hobby all the much more. I’ll stack my work up against a factory piece any day. For one thing, my grain match will be significantly better. Younger woodworkers must be given this gift to allow them to strive for exceptional and not perfect.
A few years ago when my wife and I visited a historic town in the Netherlands I noticed the siding of all the buildings was hand planed planks. Each path of the plane left a telltale trace of a cambered iron along the full length of the plank still visible under the paint. Probably what I would call a jack plane. I thought how much nicer this looks than a fully machined flat surface.


 Joel's Blog
 Built-It Blog
 Video Roundup
 Classes & Events
 Work Magazine
You didn’t mention plane sole flatness and where the flatness is most important. Also I didn’t hear (yet) is a discussion of the importance of technique of using the plane. Don’t angle of attack (skew), speed and downward pressure all contribute to a better cut as well?
I watch too much YouTube makers and I’ve come to suspect that even with a finely tuned plane and good technique it often comes down to the piece of wood and the luck of the grain.
This quest for perfection has haunted me through 40+ years of a great hobby. Now that I am able to fully appreciate the exceptional work I do I am able to enjoy this hobby all the much more. I’ll stack my work up against a factory piece any day. For one thing, my grain match will be significantly better. Younger woodworkers must be given this gift to allow them to strive for exceptional and not perfect.
A few years ago when my wife and I visited a historic town in the Netherlands I noticed the siding of all the buildings was hand planed planks. Each path of the plane left a telltale trace of a cambered iron along the full length of the plank still visible under the paint. Probably what I would call a jack plane. I thought how much nicer this looks than a fully machined flat surface.