|
|
08/25/2007 |
 Every time someone comes in and buys a marking or mortise gauge, I give them a quick demo on how to use it. It's not unusual for customers to know they need a gauge, but not how to use one. It's not their fault. There is a hell of a lot of misinformation on this subject, and using a gauge properly isn't intuitive. Every time someone comes in and buys a marking or mortise gauge, I give them a quick demo on how to use it. It's not unusual for customers to know they need a gauge, but not how to use one. It's not their fault. There is a hell of a lot of misinformation on this subject, and using a gauge properly isn't intuitive.
The goal of a gauge is to provide a line that is just deep enough to catch a chisel or a pencil. Some people like deep cuts with a knife, but the deeper the gauge line, the more you will have to plane the finished surface - otherwise finish will catch in the line and the entire world will see the gauge line. The great woodworking writer Charles H. Hayward noted that when he apprenticed (around 1910) visible gauge lines in a finished work was considered sloppy but it was a common practice. These days, it is all too common and perversely considered a proud mark of "hand craftsmanship."
The problem that people have in using gauges is that when the gauge sits square on the wood, its pin will dig in, follow the grain, wobble, and give you a jerky cut. So various woodworking gurus have advocated filing the pins really short, so even if the gauge sort of works, you can't see where you are going; filing them into knives, so you get a deep line that is hard to get rid of later; remounting the pins on a diagonal; and giving up entirely and using a wheel gauge.
Here is how you really solve this problem:
1) Set the fence to the right setting.
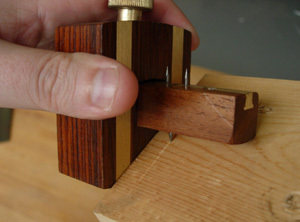
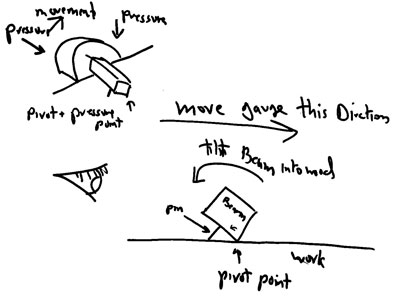
2) With your hand curled around the fence and beam, tilt the gauge away from you and rest it on the long cornered edge of the beam (the corner away from you). The picture and diagram should make this easier to understand.
3) Put pressure on the fence in so the gauge is tight against the wood, and with the corner of the bean firmly on the wood, tilt the gauge towards you. With this method, with all the pressure going into the fence and edge of the beam, it is trivial to control the pressure on the pin. You can have a tiny bit of pressure on the pin that just leaves a mark for smooth visible wood, or you can just as easily bear down on with more pressure for rough wood so that you get a mark you can see.
3) Then push the gauge away from you, always keeping the long edge of the beam on  the word. You push the gauge away from you so that you can see what you are doing. And of course with the pin tilted it won't dig into the wood. the word. You push the gauge away from you so that you can see what you are doing. And of course with the pin tilted it won't dig into the wood.
4) You don't want the gauge to go off the the end of the board, because once the beam goes off the wood, you will lose control. So stop just before the end of the line and repeat from the other end of the board this time tilting the gauge towards you.
5) It's better to have a light mark than a dark one. If you have trouble seeing your scribe mark, just run a very sharp pencil in the groove.
6) That's it. A sharp pin isn't super important because in general you want a thin shallow line, but that's a personal preference. I don't think I have ever sharpened a pin in my life.
We sell gauges from about $15 and up. They all work. If you are getting just one gauge, I would suggest the Marples screw adjustable combination gauge. The screw adjust allows you to set the width of a mortise independently of the fence setting, which is a real boon. However, in a pinch all the gauges we sell work. You don't need the fancier Trial 1, although I do like the weight of it. Colen Clenton's gauges (no longer available) feel wonderful in the hand. You won't regret the purchase, but it's certainly a next gauge to get, when you settled into joinery and have the urge to splurge. Over the years I have acquired a lot of gauges because I will set a gauge to particular measure, and then put a piece of tape over the thumbscrew so that I don't accidentally move it, and I'll recognize that it's set for a particular project. On a long project, I can tie up gauges for months, so I have a bunch of gauges.
You'll see over the years and over your projects a hierarchy of favorite and "others" will naturally emerge.
PS - The scribe line in the picture looks a little ratty because it took a bunch of tries to get a shot in focus.
|
Join the conversation |
|
 Joel's Blog
 Built-It Blog
 Video Roundup
 Classes & Events
 Work Magazine


 Every time someone comes in and buys a marking or mortise gauge, I give them a quick demo on how to use it. It's not unusual for customers to know they need a gauge, but not how to use one. It's not their fault. There is a hell of a lot of misinformation on this subject, and using a gauge properly isn't intuitive.
  the word. You push the gauge away from you so that you can see what you are doing. And of course with the pin tilted it won't dig into the wood.