|
|
04/17/2014 |
 Click here for the start of this series. In the nineteenth century (and less so the twentieth) you could purchase edge tools with or without a handle. Especially in the era before 1850, when ferruled tools became common, handling was a labor intensive job. In Sheffield the job of handling was and still is done by the Cutler. Click here for the start of this series. In the nineteenth century (and less so the twentieth) you could purchase edge tools with or without a handle. Especially in the era before 1850, when ferruled tools became common, handling was a labor intensive job. In Sheffield the job of handling was and still is done by the Cutler.
The complex shape of a mortise chisel make is seem like a daunting task to re-handle but it's not.
I'm going to repeat a paragraph from the previous blog in this series because it is so important:"
"A point to understand is that the handles are held on the tang by compression. It's exactly like driving a nail into end grain, only bigger. Like a nail or a Japanese plane iron what holds the tang in the wood is pressure from the compression, and just as if not more important, the fibers of the wood getting bent back and resisting the tang being pulled out. In theory at least one might strive for a hole for the tang that is just a tad smaller than the tang is and fits it like a glove. In reality that's impossible to do and doesn't matter anyway. The compression forces are so high that as long as there is reasonable engagement we will be able to stick a tang in the handle and even before it's driven completely home - it will be impossible to remove. "
 The other thing to consider is the condition of the chisel bolster where the handle has to butt up flush against. In theory the bolster should be reasonably flat but in this particular case the bolster is uneven from a crude forging process. If the handle doesn't fit flush against the bolster it won't transfer forces from the handle to the chisel evenly and will crack. I have two solutions to this. Grind the bolsters flat. On a high speed grinder this is pretty easy to do and takes minutes. If this chisel wasn't a sample from my collection that's what I would do. The other solution, which is found on so many old mortise chisels is a leather washer. The leather compresses and takes up any gaps. But because of the uneveness in the first place the leather won't compress evenly and you will have uneven handle pressure and eventually the handle will crack. This solution is better than doing nothing, and helps the forces a little, but I hate it. But since I don't want to grind this chisel, and it gives me one more operation to show off, leather washer it is. But I hate it. As it turned out at the end if it all we ground the bolster sides a little as when we flushed up the handle. You can see uneven bumps in the bolster and when the handle breaks I expect to just grind the bolster flat and do a proper job. This particular tang also had barbs on it from a past repair. The barbs screwed up the fit on the first handle I made (too loose) so I ground them off for the second one and that worked much better. The other thing to consider is the condition of the chisel bolster where the handle has to butt up flush against. In theory the bolster should be reasonably flat but in this particular case the bolster is uneven from a crude forging process. If the handle doesn't fit flush against the bolster it won't transfer forces from the handle to the chisel evenly and will crack. I have two solutions to this. Grind the bolsters flat. On a high speed grinder this is pretty easy to do and takes minutes. If this chisel wasn't a sample from my collection that's what I would do. The other solution, which is found on so many old mortise chisels is a leather washer. The leather compresses and takes up any gaps. But because of the uneveness in the first place the leather won't compress evenly and you will have uneven handle pressure and eventually the handle will crack. This solution is better than doing nothing, and helps the forces a little, but I hate it. But since I don't want to grind this chisel, and it gives me one more operation to show off, leather washer it is. But I hate it. As it turned out at the end if it all we ground the bolster sides a little as when we flushed up the handle. You can see uneven bumps in the bolster and when the handle breaks I expect to just grind the bolster flat and do a proper job. This particular tang also had barbs on it from a past repair. The barbs screwed up the fit on the first handle I made (too loose) so I ground them off for the second one and that worked much better.
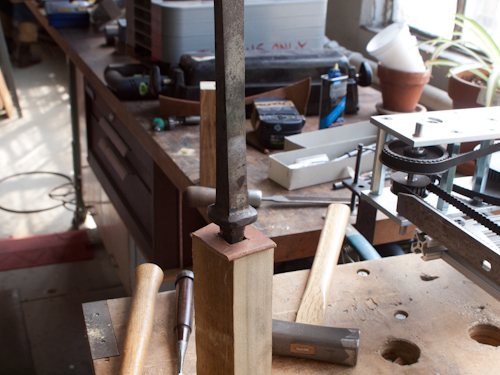
 1 - Find a square scrap of wood the right size. The average mortise chisel handle is about 5 1/2" long. It should be the same proportion as your bolster on the chisel but since we want the handle to taper made it bigger. 1/8" to 1/4" seems about right. But don't taper it yet. The most important characteristic the wood must have is that it should not be brittle and it should be bone dry. Brittle wood won't compress and will split. And wood that isn't dry will shrink both inside and out and shrink away from the tang, making it loose. This handle was pretty long. We trimmed it down after we were all done. 1 - Find a square scrap of wood the right size. The average mortise chisel handle is about 5 1/2" long. It should be the same proportion as your bolster on the chisel but since we want the handle to taper made it bigger. 1/8" to 1/4" seems about right. But don't taper it yet. The most important characteristic the wood must have is that it should not be brittle and it should be bone dry. Brittle wood won't compress and will split. And wood that isn't dry will shrink both inside and out and shrink away from the tang, making it loose. This handle was pretty long. We trimmed it down after we were all done.
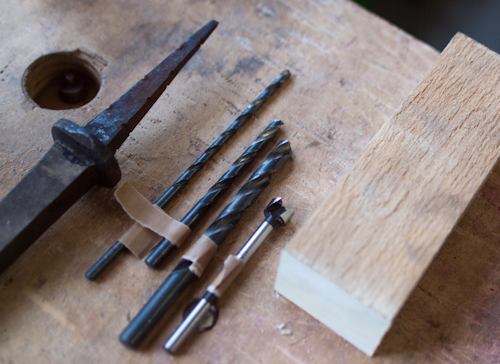
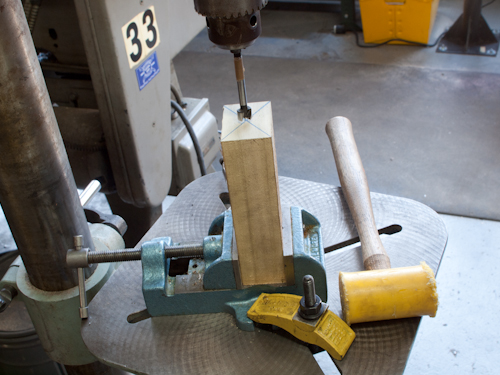
 2 - Drill the handle for the tang. On a modern tool with square, non-tapered tags one drill bit a touch bigger than the width of the tang but less than the diagonal width should work fine. For a tapered tang like I am handling in the pictures you want two bits or three. I used four because I had them handy. The big thing to check for is making sure you can get the depth you need without moving the drill press table for all the bits you are using. Starting with the largest bit, drill successively. In both tapered and non-tapered tang situations you want to drill at least 1/8" past the length of the tang. Since I am drilling into end grain I find using regular twist bits seems to track better than brad points. The reason we start with the biggest bit is to help keep the bits tracking straight. 2 - Drill the handle for the tang. On a modern tool with square, non-tapered tags one drill bit a touch bigger than the width of the tang but less than the diagonal width should work fine. For a tapered tang like I am handling in the pictures you want two bits or three. I used four because I had them handy. The big thing to check for is making sure you can get the depth you need without moving the drill press table for all the bits you are using. Starting with the largest bit, drill successively. In both tapered and non-tapered tang situations you want to drill at least 1/8" past the length of the tang. Since I am drilling into end grain I find using regular twist bits seems to track better than brad points. The reason we start with the biggest bit is to help keep the bits tracking straight.
The instructions in the Joiner & Cabinetmaker call for a single bit - which was a lot more work and hard to chisel accurately and the drill bit didn't track well.
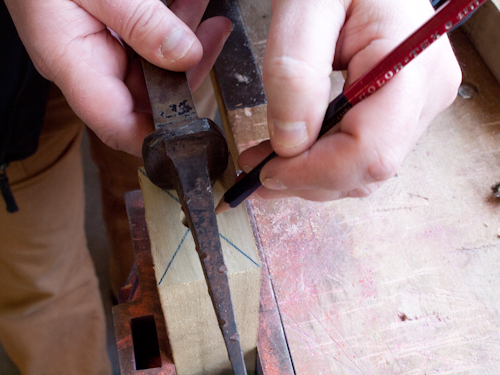
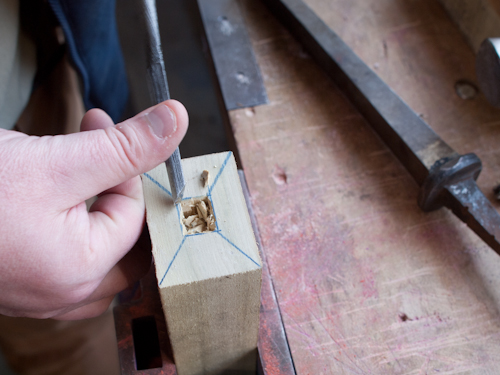
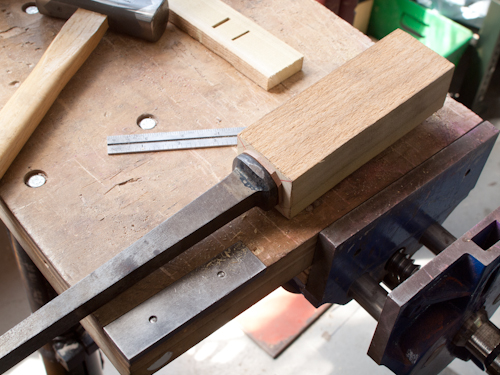
3 - Layout and then chop a rough square taper that follows the profile of the tang using the tapered hole as a guide for the square hole. You want the chisel to seat to about 1/4-1/2" in the handle. Don't worry about engagement - the compression that holds the handle is is massively strong so if your chopping isn't perfect it will still work fine. The easiest way I know of to clear the chips from the hole is to keep a drill handy with the smallest bit you used and just redrill the hole when it's clogged and then shake it out.
 4 - Chamfer out the hole at the base so the radius at the corner where the bolster meets the tang has a place to go. 4 - Chamfer out the hole at the base so the radius at the corner where the bolster meets the tang has a place to go.
5 - Do any rough shaping you need on the handle. (which I didn't do).
 5A - If you are using a leather washer cut a scrap of leather oversize and cut a hole for the tang big enough so when the leather is against the bolster it lies flat. 5A - If you are using a leather washer cut a scrap of leather oversize and cut a hole for the tang big enough so when the leather is against the bolster it lies flat.
6 - Bang the handle onto the tang. If you got the drill depths right it will compress all the wood fiber it needs to to hold on for dear life. If you got it wrong the handle either won't go on, fall off, or split the wood.
6A - If you are using a leather washer trim the excess leather away so the washer is flush with the bolster.
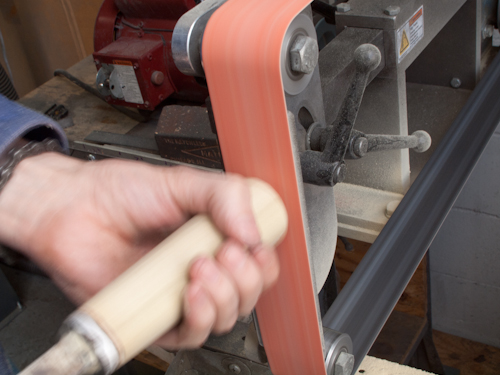 7 - Do a little more shaping of the handle. Rasps work great. Blend the handle into the bolster using files or a belt sander. While the wood might shrink or expand over time, having a flush fit is the way to go. The whole process took under under two hours. It would have taken less time if I didn't have to scout around for drill bits and if I didn't screw up the first handle. I doubt there is more than 1/2 hour of actual work in it. Most of the time was just fru-fooing around. 7 - Do a little more shaping of the handle. Rasps work great. Blend the handle into the bolster using files or a belt sander. While the wood might shrink or expand over time, having a flush fit is the way to go. The whole process took under under two hours. It would have taken less time if I didn't have to scout around for drill bits and if I didn't screw up the first handle. I doubt there is more than 1/2 hour of actual work in it. Most of the time was just fru-fooing around.
 8- If you did NOT use a leather washer you might have a gap or two between handle and bolster. A small gap doesn't mean much but you really want the bolster to support the handle all way around. So what you do is take a hacksaw and saw all around the wood at the base of the handle next to the bolster. Then drive the handle a little deeper. If that doesn't fix it repeat until the gap is gone. 8- If you did NOT use a leather washer you might have a gap or two between handle and bolster. A small gap doesn't mean much but you really want the bolster to support the handle all way around. So what you do is take a hacksaw and saw all around the wood at the base of the handle next to the bolster. Then drive the handle a little deeper. If that doesn't fix it repeat until the gap is gone.
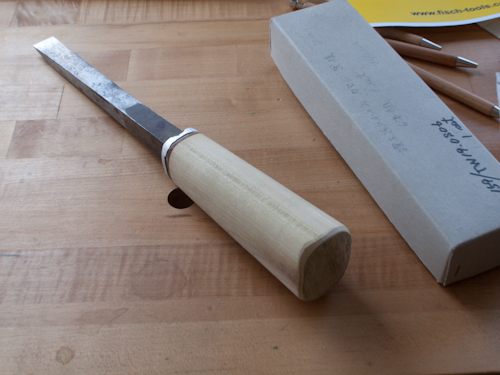
9 - Finish with linseed oil, or some other oil finish that doesn't make the handle slippery.
10 - Use your newly handled chisel on a project.
 If you look on the Internet there are some people who suggest enlarging the hole for the tang by burning in the tang. While we see broken handles where this was done this was NEVER done professionally for three reasons: It's way to easy to set a handle without doing this. It's extra unnecessary work. Most importantly, the layer of soft charcoal in the handle will make the chisel easy to bed but also make the chisel easy to loosen and fail. The technique described here works by compression and even with a minimal interference fit the compression forces are huge. After I finished Ben and Tim played Tug-of-war with the chisel and as expected the handle was fine. It's not coming off anytime soon. The method works with all tanged tools. One advantage of using a ferrule on a tanged chisel is that the wood can take a lot more compression than an unferruled handle can, but in either case the wood compresses around the tang, and the exposed ends of grain keep the chisel from pulling out. If you look on the Internet there are some people who suggest enlarging the hole for the tang by burning in the tang. While we see broken handles where this was done this was NEVER done professionally for three reasons: It's way to easy to set a handle without doing this. It's extra unnecessary work. Most importantly, the layer of soft charcoal in the handle will make the chisel easy to bed but also make the chisel easy to loosen and fail. The technique described here works by compression and even with a minimal interference fit the compression forces are huge. After I finished Ben and Tim played Tug-of-war with the chisel and as expected the handle was fine. It's not coming off anytime soon. The method works with all tanged tools. One advantage of using a ferrule on a tanged chisel is that the wood can take a lot more compression than an unferruled handle can, but in either case the wood compresses around the tang, and the exposed ends of grain keep the chisel from pulling out.
Occasionally you will run across old tangs with barbs cut into them. I'm guessing this is also an amateur repair, you don't need it and I ended up filing my barbs off.
I think the real message of this blog is not how easy it is to replace a chisel handle. But how little expertise and equipment is actually needed, and how fast the job goes. And the handle works. It's poplar - which is what I had lying around - and that uneven bolster might even be the reason why is was unhandled when I bought it. If my handle stock was a little thicker the final handle would have been more oval, but we were just following the bolster profile which is rectangle-ish. On another chisel I handled last week, not a mortise chisel, I had to use a hacksaw to get the handle flush (see above) that took a few minutes but again this isn't complicated and nothing to be scared of.
Note: Ray Ile's 1/4" and 5/16" Mortise chisels will be back in stock by the end of next week (April 23th or so)
This post draws to the end the series on mortise chisels. I know I left some topics out such as how to chop a mortise, why the grind angles, and other stuff. I'll cover that in the future.
|
Join the conversation |
|


 Joel's Blog
 Built-It Blog
 Video Roundup
 Classes & Events
 Work Magazine
However, I have noticed a couple of interesting things in many of the handles that I have been able to cleanly split open and inspect.
The first is that the tapered hole for the tang is usually almost a perfect match for the taper of the tang. Given that every chisel that I've ever rehandled has had a different taper to the tang, this has led me to hypothesize that the tang itself may have been used to ream the bored hole in the handle for a near perfect match prior to squaring up the hole and driving the chisel home. Any thought about this? Have you run across any historical reference to such a practice? I, to date, have not, but it seems like a logical and simple solution to matching the taper of the handle hole to that of the tang. I've done it myself on dozens of rehandling jobs and it seems to work really well. It works especially well for smaller chisels with really small tangs where chisels weren't available in small enough sizes to chisel the tapered hole out. Like chisels 3/8" and smaller (my 1/16" chisel had an especially narrow tang).
The second thing that I've noticed is that the tangs always seem to be much more rusted than the rest of the chisel. My guess for the reason for this was that the handle blanks were not necessarily bone dry, as you say. I would expect a bone dry blank to protect the tang from excess rusting. However, the chisel handles I've split open have revealed extremely rusted tangs. The handles appeared to be original, so my guess was that since the blanks were likely air dried, that even though the outside would have been bone dry, the inside of such a thick blank may have had some residual moisture. As the residual moisture then dried off, the handle could have then further shrunk onto the tang (like the joinery on green wood chairs) making for an even tighter and closer matching fit to the tang, but also contributing to the rusting of the tang. I would think a small amount of residual moisture in the inside of the air dried handle blank could also allow for a bit more compression than a blank that was completely bone dry all the way through.
I don't have any historical evidence for either of these two notions. Again, they are just guesses based uopn my observations splitting open old handles and rehandling a bunch of tanged chisels. I will repeat my agreement with you though that I have never observed a handle that had any evidence of the tang being burned in.
Thanks Joel!
I would suggest that the rusting is caused by acid in the wood. I could be wrong. I could also be wrong about the dry handle but I don't think so. A shrinking handle should shrink in diameter and and increase the hole size - in the case of a chair leg what is getting smaller is the hole in the side of the leg.
I am willing to bet that the reason your holes conform so closely to the tang is that there was compression all along the tang when the chisel was inserted. Not necessarily a uniform hole to start with.
joel
I have a couple mortise chisels awaiting new handles. I was eagerly waiting for this part. BTW glad to see my local LV now stock some of your Gramercy products, got a few on my want list :-)
Bob
-Steve
danny
Ref barbs on the tang, this was done by edge tool makers on other tools, e.g. forks or hoes when fitted to the shaft by a tang, so some makers may also have done this on chisel tangs.
Ref making tapered holes, I forged some tapered reamers from a piece of carbon steel - having first drilled a pilot hole thorugh the handle, ithey can be used to create a tapered hole - leave it undersize so that as the square tang is pushed into a round hole it compresses the fibres - not so good with short rectangular tangs, as sometimes found on mortice (with an S) chisels, they are useful on other types of tool.
One English billhook maker drilled a series of stepped holes in his handles, and drove the tang in cold - this was fine until the handle had to be twisted to apply sideways pressure, as in cleaving spars for thatching, when the 'camming'action split the handle... Probably again not relevant to mortice chisels, but useful to know....