


|
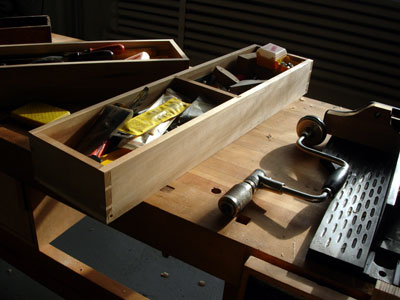 As mentioned before the key to a good toolbox is the ability to reach any tool with one hand. One hand might be holding something so you don't want to have to need two hands to lift out a tray or hold a lid open. The traditional solution is sliding tills. Tills that slide front to back, not side to side, so that you can easily lift out long planes and things stored in the bottom of the toolbox. Bogger toolboxes can have three or four levels of tills but in my knaack box there was only room for two.
 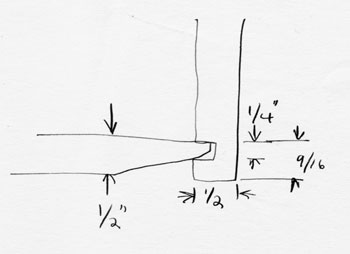 drawing shows the construction. I wanted as thin as possible a bottom that wouldn't rattle so I milled the poplar to 1/2" but I didn't want to lose any depth so I cut a 1/4" rabbet on the bottom so I would fit it with just a 9/16" loss of space. The bottom isn't glued in and is free to float, expand, and contract. I was concerned about the flexibility of the sides accidentally popping off the bottom when the tills were fully loaded, so I dovetailed in a divider using a Stanley 444.
 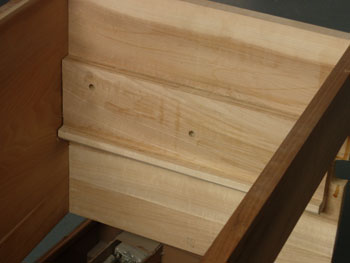 The main reason for using the 444 is I have had one for years and I wanted to know if it actually works. It does, but you can do this joint just as easily with a saw and a chisel.
 |
|
 Joel's Blog Joel's Blog |
 Built-It Blog Built-It Blog |
 Video Roundup Video Roundup |
 Classes & Events Classes & Events |
 Work Magazine Work Magazine |
| Newer Entries... | |
| Naniwa Superstones and a Tip for Flattening Waterstones Less Often - 03/17/2008 |
| Shipping - 03/08/2008 |
| Books on Business - 02/25/2008 |
| Olson Bros. Mach. Tool & Saw Co. Inc. - 02/04/2008 |
| What Do You Know about Arthur Price? - 01/13/2008 |
| Merry Christmas to All and to All a Good Night - 12/23/2007 |
| Vacation! (Time Off for Good Behavior) - 12/15/2007 |
| Stop Chamfers - 12/09/2007 |
| How to Saw a Circle with a Circular Saw. - 11/27/2007 |
| My Tool Box Part 3 - 11/18/2007 |
| POPULAR WOODWORKING's 2007 Best New Tools - 11/09/2007 |
| Split Nut Screwdriver - 11/05/2007 |
| Where is My Iron Ore? - 10/28/2007 |
| Norris Saw Collecting - 10/21/2007 |
| My Tool Box Part 2 - 10/15/2007 |
| My Tool Box - 09/29/2007 |
| Look at This! Look at That! - 09/05/2007 |
| How to Use a Marking or Mortise Gauge - 08/25/2007 |
| Sharpening your way to better woodworking - 08/18/2007 |
| Saw Filing - Poorly - 08/10/2007 |
| Older Entries... | |
|
Hours: M-F 9:00-5:00, closed Sat,Sun Our Guarantee & Return Policy Shipping and Sales Tax Info Privacy Policy Holiday Calendar |
|
Contact Us:
Email: support@toolsforworkingwood.com Phone: 800-426-4613 or 718-499-5877 Visit Us in Brooklyn: Directions to Our Showroom © 1999-2019 toolsforworkingwood.com Powered by 01 Inc. Coded entirely in NYC |

I couldn't help but notice what looks like a Stanley miter plane setup on the right
of your toolbox. Is that what it is? I have lusted after one of those for years,
hoping that Lie-Nielsen would make one and I could spend a small fortune on
it. How do you like it compared to my wooden miter plane setup?
regards,
jim