


|
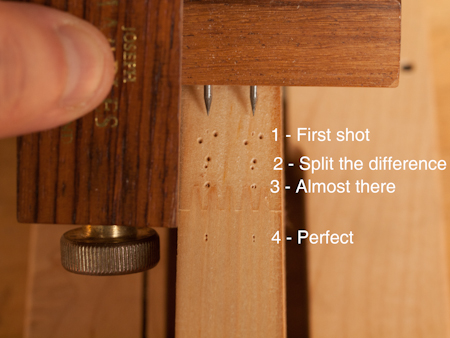 Even with a couple of tries before getting it perfect, centering a mortise on a stile or finding the center of the edge of a board is faster using a
 |
|
 Joel's Blog Joel's Blog |
 Built-It Blog Built-It Blog |
 Video Roundup Video Roundup |
 Classes & Events Classes & Events |
 Work Magazine Work Magazine |
| Newer Entries... | |
| Chris Pye's Great Idea - 04/07/2011 |
| Burning Desire (Not!) - 04/05/2011 |
| The Victorian Pocketknife - 03/29/2011 |
| Tools as Art - 2 - 03/22/2011 |
| Do You Want My Job? - 03/17/2011 |
| How To Saw Straight - 03/15/2011 |
| A Boyhood Dream Fulfilled - 03/08/2011 |
| Tool Test: Which Glue is Better - Epoxy, Yellow Wood Glue, or Liquid Hide Glue - 03/01/2011 |
| Festool New Tools and Price Increases March 1, 2011 - 02/25/2011 |
| How to Quickly Center A Mortise Or Find The Center Of A Board Without Gadgetry - 02/22/2011 |
| A New Blog - Introducting Ben Seltzer - 02/17/2011 |
| A Toolbox is Missing!! - 02/15/2011 |
| Bench-on-Bench - 02/10/2011 |
| Ron Hock Is Laughing At Me Right Now - 02/08/2011 |
| A Desk I Would Like To Make - 02/03/2011 |
| How To Camber A Plane Iron (And Why It Works) - 01/26/2011 |
| Cheater Pastrami and Getting Stuff Done - 01/20/2011 |
| Winding Sticks - 01/18/2011 |
| Dye Young - Stain Pretty - 01/13/2011 |
| Where the Factory Was - 01/11/2011 |
| Older Entries... | |
|
Hours: M-F 9:00-5:00, closed Sat,Sun Our Guarantee & Return Policy Shipping and Sales Tax Info Privacy Policy Holiday Calendar |
|
Contact Us:
Email: support@toolsforworkingwood.com Phone: 800-426-4613 or 718-499-5877 Visit Us in Brooklyn: Directions to Our Showroom © 1999-2019 toolsforworkingwood.com Powered by 01 Inc. Coded entirely in NYC |
Be consistent about choosing a reference face for all of your joints, and you'll be fine. And even if you make your mortises and tenons with a router or other power tool, the same principle applies.
All I am trying to do is show how it's done. I leave the application or not application of the technique to when it's appropriate on a particular job. It's one more technique that is easy to learn and useful to know.
Yes, I own a dial indicator, dial calipers, etc... But it's simple techniques like this that make woodworking enjoyable.
BTW, folks... This same technique works for finding the center of a piece of stock with a combo square.
Precision centering of M&T joints, in fact many joints, is a modern creation of the machine manufacturing age. Unless you are planning on a Henry Ford assembly line, it's overkill.
Relax and enjoy your work and don't worry about centering.
You should always use reference marks to keep parts correctly aligned but knowing how to trivially center something which takes only a couple of seconds more than a first guess is a good technique to know. Why find yourself in the situation where something that should be centered isn't? A Through mortise that's not centered on a chair leg will look odd. If there is no need to find the center don't do it but if finding center would improve the look or ease of construction of a project, not finding center because you don't know how is a shame - and that is what I am trying to address.
While it may not be strictly necessary to center your mortise, I think this is a good practice when working with relatively thin stock. Given that the mortise walls should be of equal thickness for maximum strength, I find this little technique helpful for at least ensuring that my mortise is not so far offset that one of the mortise walls is unnecessarily thin. A 1/4" mortise in 3/4" softwood stock, for example, really should be as centered as possible. And through-mortises should be centered for merely aesthetic reasons--an offset mortise in a stile is just going to look bad.
This technique is also helpful for resawing. I always use this method with my regular marking gauge if I am going to resaw stock, whether on the bandsaw or by hand.