Hardening Spoon Bits
We routinely get questions about the steel in our tools. "It is O1?" "A2?" "D2?" Which is better? Is the grass really greener on the other guy's lawn? What many people don't understand is that the forging and hardening process can result in different end properties for even the same alloy. This is important. In theory, what we all want is a cutting edge that will stay sharp a long time (long edge retention) and then sharpen easily. (And it helps if the material is inexpensive too.) But getting a great edge takes a lot more than selecting a specific alloy.
Chisels are the poster child for edge retention. There is a huge difference in edge retention based on a chisel alloy, the way it was made, and most importantly, the heat treatment it received. There are many stories on the internet of people taking mediocre big box store chisels, hardening them properly and ending up with a pretty darn good chisel. But proper heat treatment is challenging: even responsible traditional manufacturers have issues getting heat treatment consistent and right. Everyone uses some sort of mass hardening system with hundreds of chisels in the furnace at the same time. If the ones in the front are just right, the ones in the back or sides might be too hot or cold. The solution to this problem for the better makers is hardness-testing every chisel. Other companies have switched to different alloys, or in our case, smaller batches that we can control.
Almost all non-exotic woodworking tools are made of one sort of another of oil-hardening steel, usually O1 or its European equivalent. O1 is fairly inexpensive for a tool steel and it is easy to harden without it cracking or warping too much. For those of us who wish to play along at home, the standard way of hardening O1 without a lot of equipment is to heat the metal up to cherry red, quench it in oil and then anneal it to the correct level of hardness by heating it up again to the right color. I have made dozens of tools with a cutting edge with this method. The problem is consistency. One solution for some companies is to switch to A2, an air hardening alloy with great edge retention - but sharpening it to the same level of sharpness as O1 can be tricky.
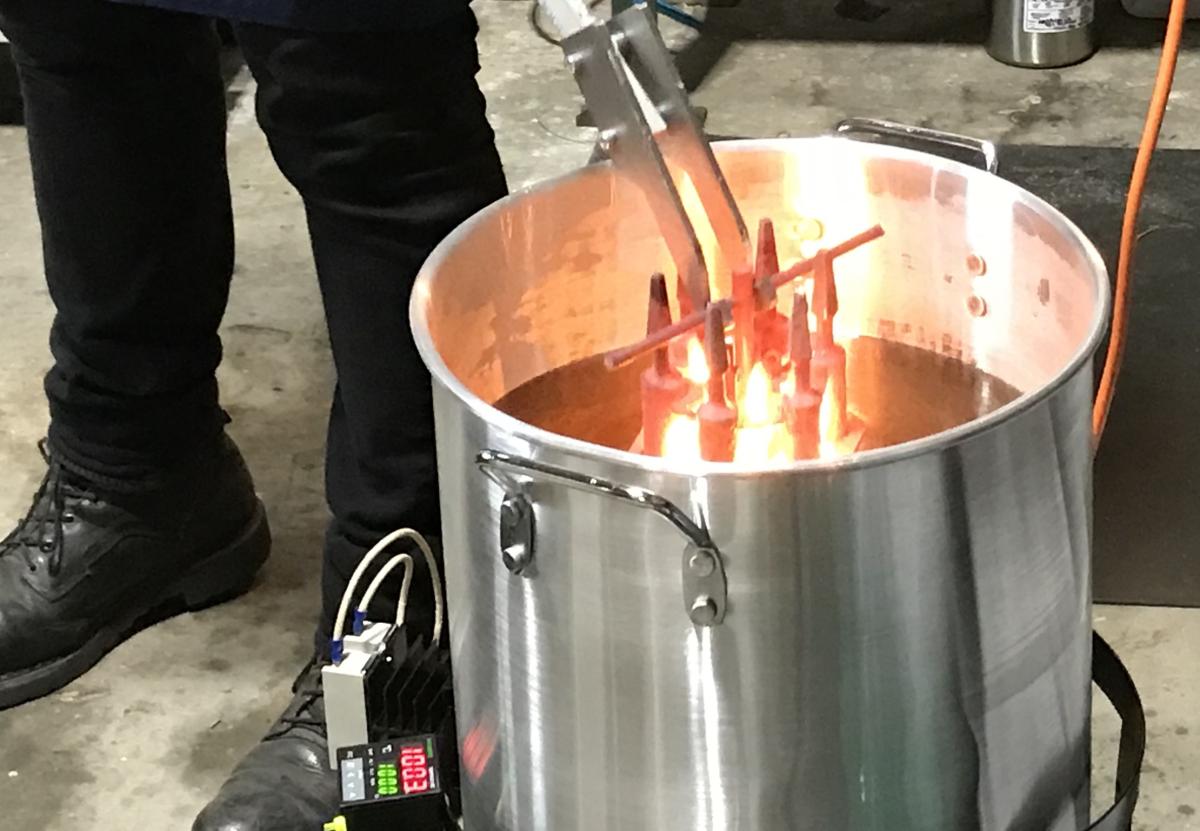
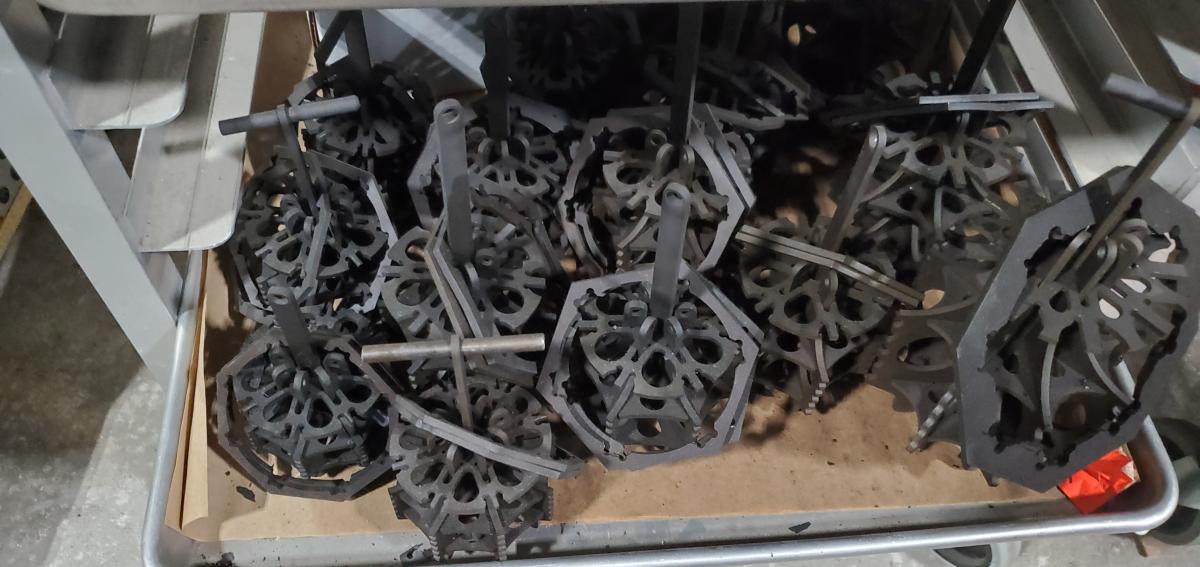
The issue of hardening is why most companies send out their cutting tools to professional hardening places. We tried that with our old Kings County Hammers but it didn't work. Hammer heads should be hardened with very hard faces - so they stay smooth and don't dent the work - and soft cores so that the hammer doesn't crack when you hit something with it. The hardening companies we dealt with simply could not understand the setup and care needed to deferentially harden hammer heads. Breakage and cracked hammer heads were epidemic and we had to kill the product. When we next needed hardening, it was for the Gramercy Tools Spoon Bits. We make a mean spoon bit, but they are nightmares to machine and as we found out when we hardened the first one, the hollow or spoon that defines them also makes them warp then you harden them. The solution was to fixture the bits in a clamp so that they cannot move in the furnace or quench. Based on the the hammer experience we realized that we didn't want to take the chance having a third part company try their hand. So we decided to do the hardening and tempering in house.
The first question we asked was, How do you sharpen O1? We could have made the spoon bits out of A2 or another alloy that is easier to harden, more stable, and has better edge retention, but we wanted O1 because it gets wicked sharp (which is important when drilling holes). Hardening and annealing steel depends on moving the steel uniformly through different stages of crystal formation and blending. It turns out that the process described above won't get you a great result. With research, we found out that we needed a couple of computer controlled kilns, a computer temperature controlled oil bath and another one for water.
This is the sequence we used.
Preheat:
Ramp full speed to 1200° F
Hold 15 minutes.
Harden:
Ramp full speed to 1550° F
Hold 30 minutes
Quench @ 150° F in heated quench oil
Wash with soapy water to remove excess oil
Temper @ 350° F for 2 hours.
We didn't invent this sequence, unless by invent you mean we "looked it up" (which is what we did). But when all said and done we found out something really interesting. The O1 spoon bits we made had the longest edge retention of any O1 tools we had. Ridiculously so. And the reason of course is we had optimal conditions (small batches we can pay attention to) and the right full sequence of hardening processes (which we looked up) and equipment (which we bought or made). We weren't just quenching the bit in any ol' oil, we were quenching it in the right oil at exactly the right temperature. The setup took a long time to build. We also use argon gas to keep oxidation down, and the entire heat treat area is surrounded by a big vented hood so we don't spread burned oil fumes. Incidentally you don't use whatever oil to quench - for best results we use Dubois AAA Quench Oil which is designed to cool O1 steel at the right speed to prevent cracking and stresses.
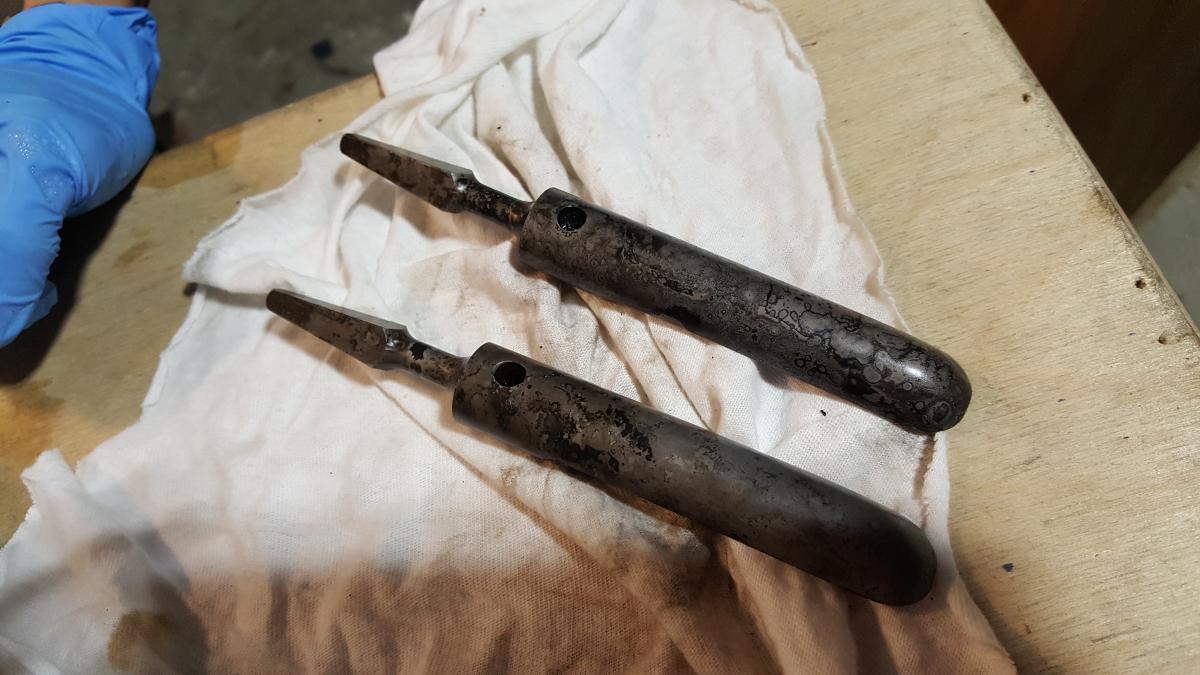
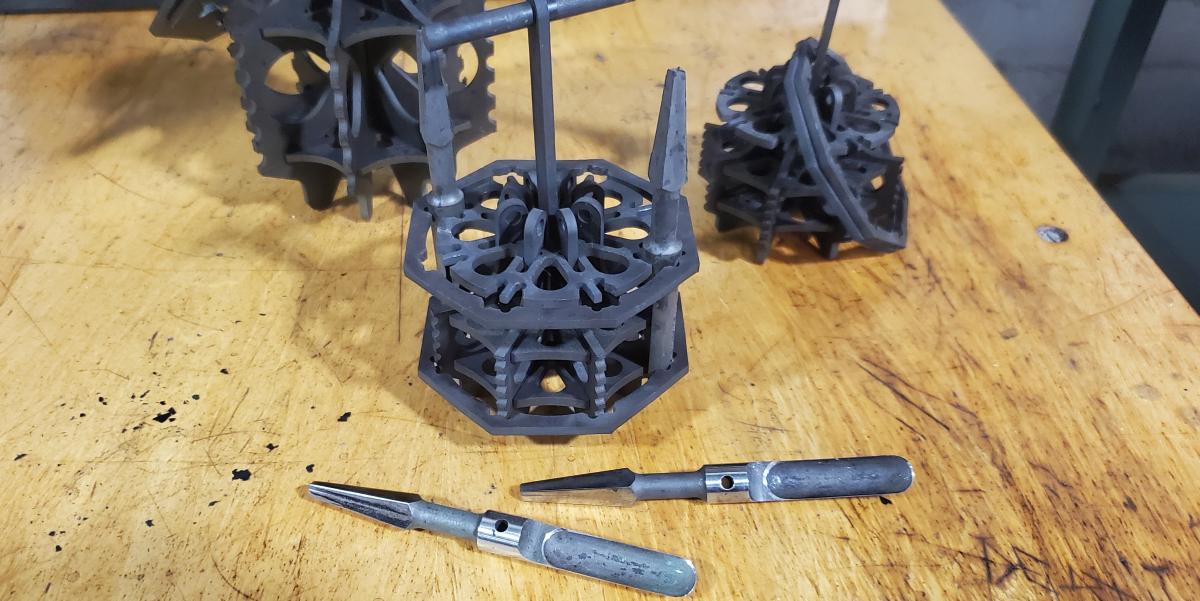
We use the same sequence for hardening our spoonmaker's drawknives and get the same great longevity of edge retention. Being flat, the drawknives are so much easier to harden than the spoon bits. A mass of hardening fixtures Two large spoon bits out of heat treat and ready for sharpening and polishing A single hardening fixture and some spoon bits
I am of very mixed emotions about all of this. I am totally pumped by the result. As a boutique manufacturer of edge tools I am thrilled that our attention to detail, small batches and hand-holding pays off in a meaningful way. But it's tiring to constantly have to keep your eye on the ball. I really wish I felt we could send more stuff out for hardening like everyone else.
Join the conversation
05/04/2022 Ed Latson
Joel,
Your blogs are spot on with your detailing certain trials and errors. Too often we take for granted that every tool, every time, all the time will be as close as possible to being superb in all ways. Thank you for continuing to enlighten us…and Joel?
Two thumbs wayyyy up!
Nice work, very nice…
05/04/2022 CT Engineer
My father-in-law was a woodturner. He had a production facility, but really loved hand turning. He had a 2" gouge from Buck that he had nursed most of his career because no one was making them anymore. He knew that I had access to a machine shop and so, he showed me his 2" gouge with about 2-1/2" inches remaining below the tang and asked me to make him a replacement.
He had no idea of the magnitude of the project, but I got help from the shop manager and sourced some hardenable steel (stainless) from Carpenter (2" bar stock) and started roughing out the length and tang with a band saw and taper with a fly cutter. Then I found some round stock with the right radius for the center of the gouge and hand-forged the arc of the gouge.
Then I annealed it back soft so I could bring the gouge to final form and smoothed it with a grinder and sander. Then I hardened the tool, and followed the recommended quenching and annealing process until I reached the desired Rc harness. I did a final polish and a rough sharpening.
Because I had to buy a minimum order from Carpenter I had more than enough stock so I made two gouges and also two large skews to go with them. When I presented the set he was rapturous. As a turner you could do all your work with a gouge and a skew if you were forced to.
A couple years later he retired and joined a club here in the NE. Everyone in the club wanted the same 2" gouge, but I had moved on and lost my access to the machine shop and forge equipment. Sadly that is the current state of affairs.
If you guys thought about making large gouges you could check with local turners to verify the market but it is likely not much different than for spoon bits. With your experience with spoon bits you could easily transition to 2" gouges, technically (and practically with a larger electric furnace). BTW: The hardenable stainless was overkill in a tool that is typically used indoors. I had no trouble with warping in my hand work. BTW, I left the tangs soft like you would for a lathe tool used for roughing billets.
05/04/2022 Wink
What a fascinating look behind the curtain! Thank you so much for sharing this. Perhaps in a future post you’d be willing to share how and with what materials the hardening fixtures are made, and how you tool up for production sharpening runs!
Many thanks again for all the gems you sprinkle in our inboxes with this blog…
05/04/2022 Jim Newman
Thank-you for sharing your journey for the spoon bits Joel, so we have a better grasp of the effort and hard won knowledge it takes to understand how quality tools are given "birth"!
Great insight to being a small manufacturer. I'm hoping you vertically integrate as much as possible and keep it in house.
05/04/2022 Charles Stratton
What a great look into the complications inherent in heat treating tool steel. My recent experiences with buying and reworking old cast steel chisels and plane blades have been raising a lot of questions in my mind. For some time I've been thinking that the heat treatment is probably the most neglected issue in the process. Thanks again.
05/04/2022 Dave Polaschek
For what it’s worth, I own a full set of the spoon bits, and they are serious awesome-sauce. I find myself reaching for them for making all sorts of holes. Your extra work on them pays off, and I tip my hat to you! I’ve hardened O1 before, but I’m more of a trial and error kind of guy, and it often takes me multiple tries to get everything perfect, so I really do appreciate the extra work you put in on them.
05/04/2022 Steve D
I am really impressed with your quenching fixture. Thanks for sharing.
05/04/2022 bill
your heat treating needs sounds like a business opportunity....
This was a very interesting article. I am a blacksmith and making tools for my own work is the nicest thing about my trade. You have great pride in your work which warms my heart to see.
Thank you for the very nice article.
05/05/2022 Joseph R. Janutka
What a great post! Thank you for the insight. The spoon bits look more like reamers than spoons to me, but what do I know!!!!
05/05/2022 Gav
As a friend of mine who works in construction says "Building stuff is hard enough as it is without any extra complications" He was being polite about the customers. I like to think that your customers appreciate the efforts, I know I do having purchased some of your products, the saw clamp is awesome. Please don't be disheartened by the process. Your efforts are appreciated.
05/15/2022 David Weaver
I have been making and hardening tools for quite a while now, but I don't make them day in and day out, so I can do the hardening and tempering for a small group of steels entirely by hand and eye, including a thermal cycle.
I never sent them out because there is no reason to. I think a temp. controlled furnace may be better for someone who is a bit newer, but it's possible to do steels that don't have a significant amount of chromium or vanadium (O1, 1095, 26c3) without buying a furnace and match schedule hardness and toughness (both) working by eye.
I got a lot of grief for saying that but eventually sent samples to Larrin Thomas (Knife Steel Nerds) and only came up sort on 1084 (that's solvable, I'm sure - I don't use it) and as a wild card, with CTS XHP (slightly underhardened, still usable - but shouldn't be open atmosphere heat treated, anyway).
A2 is "OK", but it offers no real advantage over O1 for a user unless someone is comparing tools of different hardness. I could do 100 full size O1 tools and none of the lot would be different in hardness by more than 1 point. The test coupons that I sent varied by an average of 0.2 on the c scale. the myth that simple steels can't be heat treated with care in a small shop is something is basically an "outdated modern myth".
26c3, by the way, makes the best chisels I've ever seen of western types, but it's also a water hardening steel and not as easy to work with. And better results are had heating it in a gas forge quickly by eye than by soaking (I can match commercial schedule hardness and better the commercial schedule toughness results).


 Joel's Blog
 Built-It Blog
 Video Roundup
 Classes & Events
 Work Magazine
Your blogs are spot on with your detailing certain trials and errors. Too often we take for granted that every tool, every time, all the time will be as close as possible to being superb in all ways. Thank you for continuing to enlighten us…and Joel?
Two thumbs wayyyy up!
Nice work, very nice…
He had no idea of the magnitude of the project, but I got help from the shop manager and sourced some hardenable steel (stainless) from Carpenter (2" bar stock) and started roughing out the length and tang with a band saw and taper with a fly cutter. Then I found some round stock with the right radius for the center of the gouge and hand-forged the arc of the gouge.
Then I annealed it back soft so I could bring the gouge to final form and smoothed it with a grinder and sander. Then I hardened the tool, and followed the recommended quenching and annealing process until I reached the desired Rc harness. I did a final polish and a rough sharpening.
Because I had to buy a minimum order from Carpenter I had more than enough stock so I made two gouges and also two large skews to go with them. When I presented the set he was rapturous. As a turner you could do all your work with a gouge and a skew if you were forced to.
A couple years later he retired and joined a club here in the NE. Everyone in the club wanted the same 2" gouge, but I had moved on and lost my access to the machine shop and forge equipment. Sadly that is the current state of affairs.
If you guys thought about making large gouges you could check with local turners to verify the market but it is likely not much different than for spoon bits. With your experience with spoon bits you could easily transition to 2" gouges, technically (and practically with a larger electric furnace). BTW: The hardenable stainless was overkill in a tool that is typically used indoors. I had no trouble with warping in my hand work. BTW, I left the tangs soft like you would for a lathe tool used for roughing billets.
Many thanks again for all the gems you sprinkle in our inboxes with this blog…
Thank you for the very nice article.
I never sent them out because there is no reason to. I think a temp. controlled furnace may be better for someone who is a bit newer, but it's possible to do steels that don't have a significant amount of chromium or vanadium (O1, 1095, 26c3) without buying a furnace and match schedule hardness and toughness (both) working by eye.
I got a lot of grief for saying that but eventually sent samples to Larrin Thomas (Knife Steel Nerds) and only came up sort on 1084 (that's solvable, I'm sure - I don't use it) and as a wild card, with CTS XHP (slightly underhardened, still usable - but shouldn't be open atmosphere heat treated, anyway).
A2 is "OK", but it offers no real advantage over O1 for a user unless someone is comparing tools of different hardness. I could do 100 full size O1 tools and none of the lot would be different in hardness by more than 1 point. The test coupons that I sent varied by an average of 0.2 on the c scale. the myth that simple steels can't be heat treated with care in a small shop is something is basically an "outdated modern myth".
26c3, by the way, makes the best chisels I've ever seen of western types, but it's also a water hardening steel and not as easy to work with. And better results are had heating it in a gas forge quickly by eye than by soaking (I can match commercial schedule hardness and better the commercial schedule toughness results).