| | 12/17/2017 | 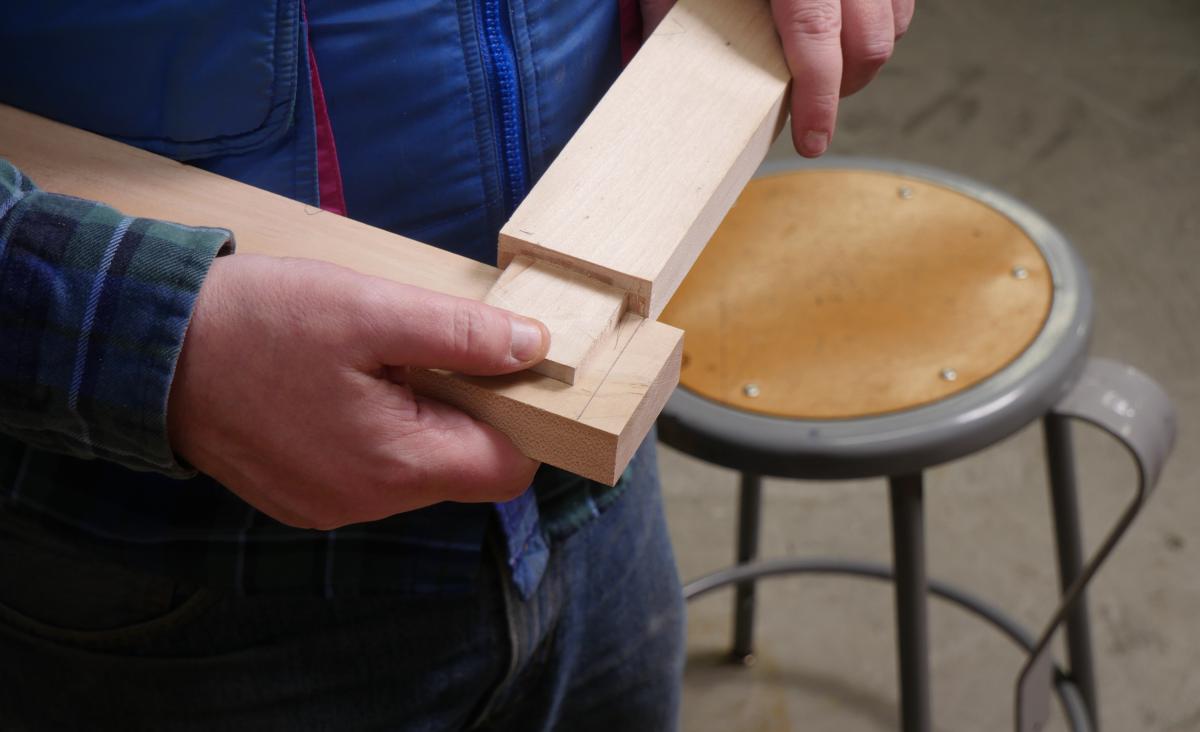
Many moons ago I studied woodworking with Maurice Fraser at the Crafts Students League of New York. Maurice taught me a mortising technique that he had developed over time. Then, about five years after I stopped taking classes, Maurice called me all aflutter because he found the exact instructions for mortising that he had been teaching all these years. The instructions were in the first English book about woodworking: Joseph Moxon's Mechanick Exercises (1678). The book was well-known in certain woodworking circles back then - I had heard of Moxon and had even glanced through the book - but it had nowhere near its current popularity. As Maurice discovered with his own reading of the book, Moxon championed the "Maurice way" of chopping a mortise. Here is my how-to based on Moxon's technique.
The Goal:
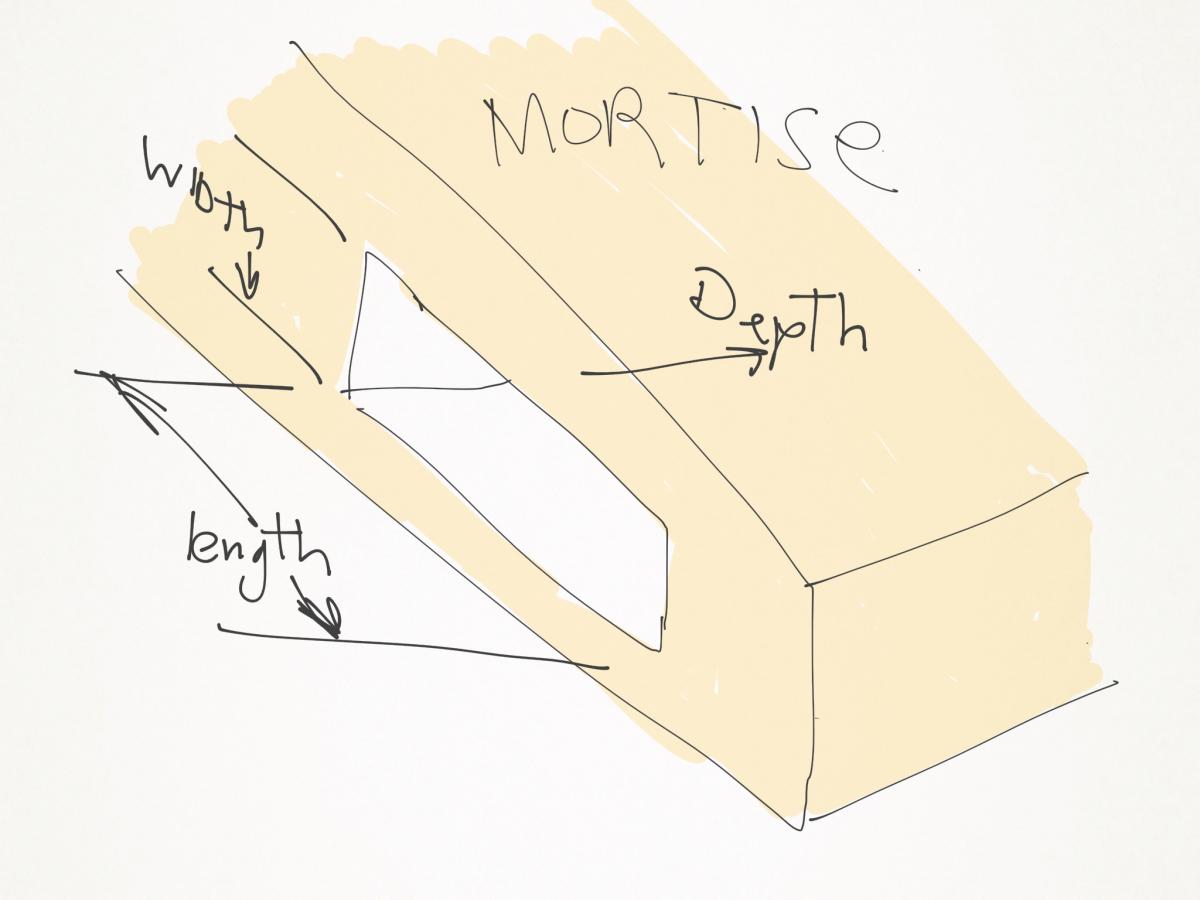
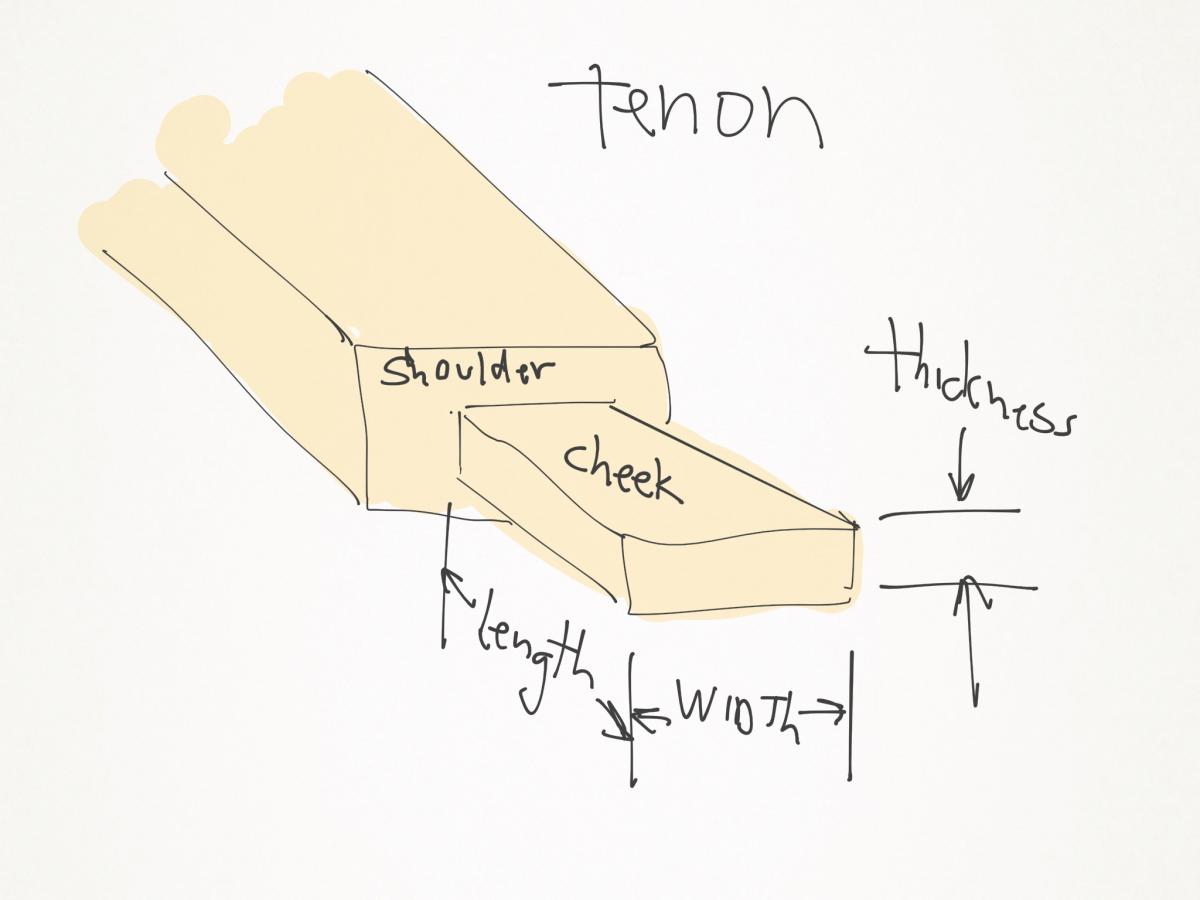
The goal in mortising is to join two pieces of wood, usually a stile - the vertical piece - to a rail, the horizontal piece. While there are hundreds of permutations of the joint (ones glued in, doweled in, mitered at the bottom, cut off or haunched at the top, etc.), at its simplest, a mortise-and-tenon joint is the end (typically rectangular), of a rail, stuck in a hole (also typically rectangular) that is chopped into the stile. Glue or a dowel is used to keep the two parts from disassembling.
Mortise and tenon terminology is at best confusing.
Mortise-and-tenon joint can be "blind" - the tenon ends somewhere in the body of the stile - or "through" - the tenon goes completely through the style and is either flush to the opposing face of the stile, or decoratively planned to stand proud. If you were to look at a piece of furniture with a blind joint, you would not ordinarily be able to see the quality of the joint, though a sloppy fit will fail over time because of sheer stress on the glue. With a through joint, on the other hand, the fit of the tenon in the mortise is visible on the exposed side of the joint. Sloppy work is noticeable right away.
The width of a mortise is based on the size of the rail material. Theoretically at least, you can make the mortise very, very thin in proportion to the rail thickness, but you would get a mortise only as strong as the actual section of the tenon that's left. You could also make the tenon very very fat, but reducing the shoulder size weakens the joints resistance to torque. Over the years the basic rule of thumb is that the width of the mortise should be about one third of the width of the rail. The height of the mortise should be about three quarters of the height of the rail. Obviously these ratios are for reference only and the dimensions can be modified based on other mechanical requirements of the project and the tools available. Usually the tenon is centered on the rail, but actual positions are very variable, again depending on the project.
Which Comes First, Mortise or Tenon?
The answer is whichever side of the joint will be more consistent. Supposing you are making a table with eight mortises attaching the legs (stiles) to the rails supporting the table. If you are using a table saw to cut the tenons in the rails, it is a pretty quick process, and the tenons will be consistent. However they might not be totally consistent to a standard measurement. .380" not .375", or .365" not .375". If you have previously chopped your mortises at .375 exactly, or if you used a 3/8" mortise chisel and they are a touch bigger, there is no guarantee that you will be able to assemble your joint without shaving all the tenons, or getting a looser fit than you would like. On a through mortise, even .01" can be unsightly. If, as in this case, you first make your totally consistent tenons, then set your mortise gauge and scribe your mortise to whatever the actual final thickness of the tenons actually is, you will get a perfect fit no matter what the actual tenon dimension turns out to be.
If you are sawing your tenons by hand, you might want to measure each tenon for finished thickness and then scribe the mortise to what you actually ended up with. I can easily hit any precise width with my mortise. Tenons are a lot harder for me to saw consistently. With machine-made mortises, of course the opposite is true.
But you say. "My mortise chisels are of a specific width. What do I do?" And this is what sets apart the Moxon method from other approaches. Scribe the mortise to the exact dimension you want and then pick the next smallest size of mortise chisel that you own. This is why, unlike any other type of chisel, mortise chisels were (and still are) sold in 1/16" increments, not 1/8" increments like bench chisels. Chop the mortise. (We will go into this topic in excruciating detail in Part 2.) With a slightly narrower chisel, you will end up with a tiny amount of material on the sides of the mortise inside of the scribe line that needs to be removed. What Moxon describes is that when you are all done chopping, you place a wide paring chisel on the scribe line and push down. It's a trivial operation, the excess material just peels off with a little downward pressure on the chisel. You're left with a perfectly sized joint. Another awesome advantage of paring is that with a little wiggle room in the joint, you do not need to be as precise in chopping as you would if the finished joint were intended to be the same width as the chisel.
Before I start chopping I need to lay out my joint.
Layout:
In this case, I am making a simple blind mortise for a frame and panel. Depending on the joint and your mood at the time, you can cut the groove for the panel first or last. But in general you should do joinery first, so that you are working with beefy square parts. I'll write more about laying out the mortise later, but for now we are focusing on the tenon. If I were making a frame and panel to a specific size, I would have cut the rails to the correct size, leaving material for the tenons. It's important to pick one face and edge of the rails for reference; all measurements and square lines need to come off those reference edges. Otherwise if your material isn't perfectly parallel, you will never get your scribe lines to line up. First I will lay out the tenon shoulders with a knife. I mark all around with a square and knife.
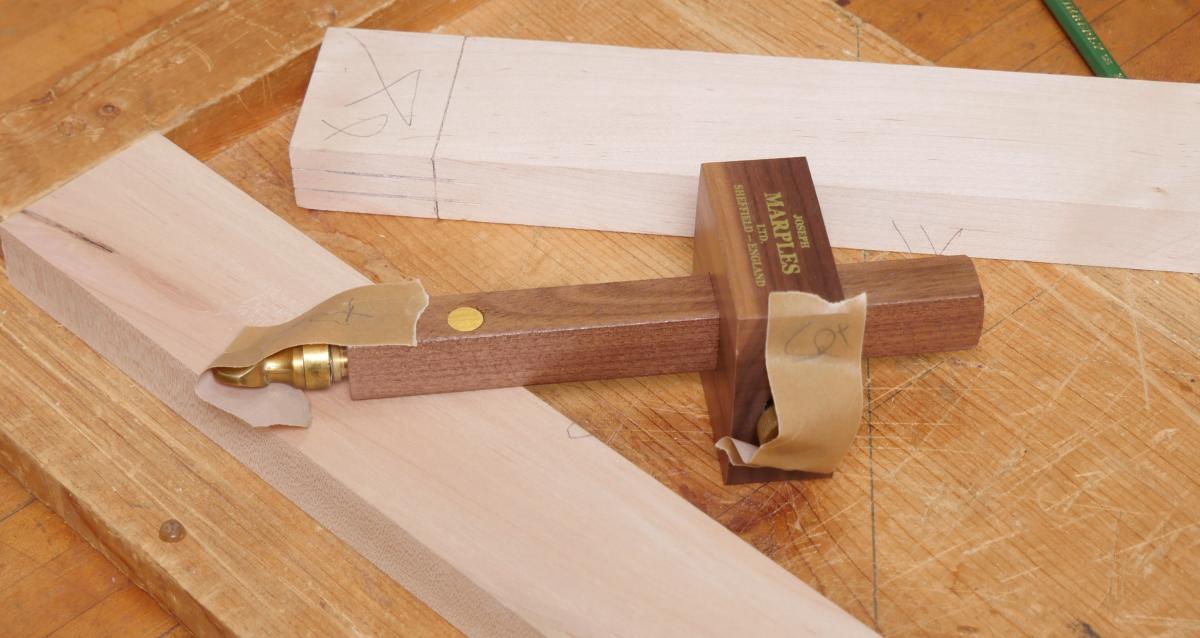
Using the 1/3 rule, I set my mortise/combination gauge and lay out the tenon. Centering the mortise pins on the work is pretty easy. I wrote about the method a long time ago, in a blog here. Using a sharp pencil, I darken the scribe lines so I can see what I am doing. One important feature of working by hand is that there is no real benefit to laying out the mortise and tenon at the same time. Depending on how well I saw, I should be fine, but it's also possible that the final tenon will be a different dimension. But for now at least I put tape on both the mortise adjustment and the fence adjustment on my mortise gauge so that I don't mindlessly move them. When I need to lay out the mortise, they will be perfectly set if need be. In case you don't use a marking or mortise gauge much, check out this link to a blog I wrote on how to use a mortise gauge.
Sawing:
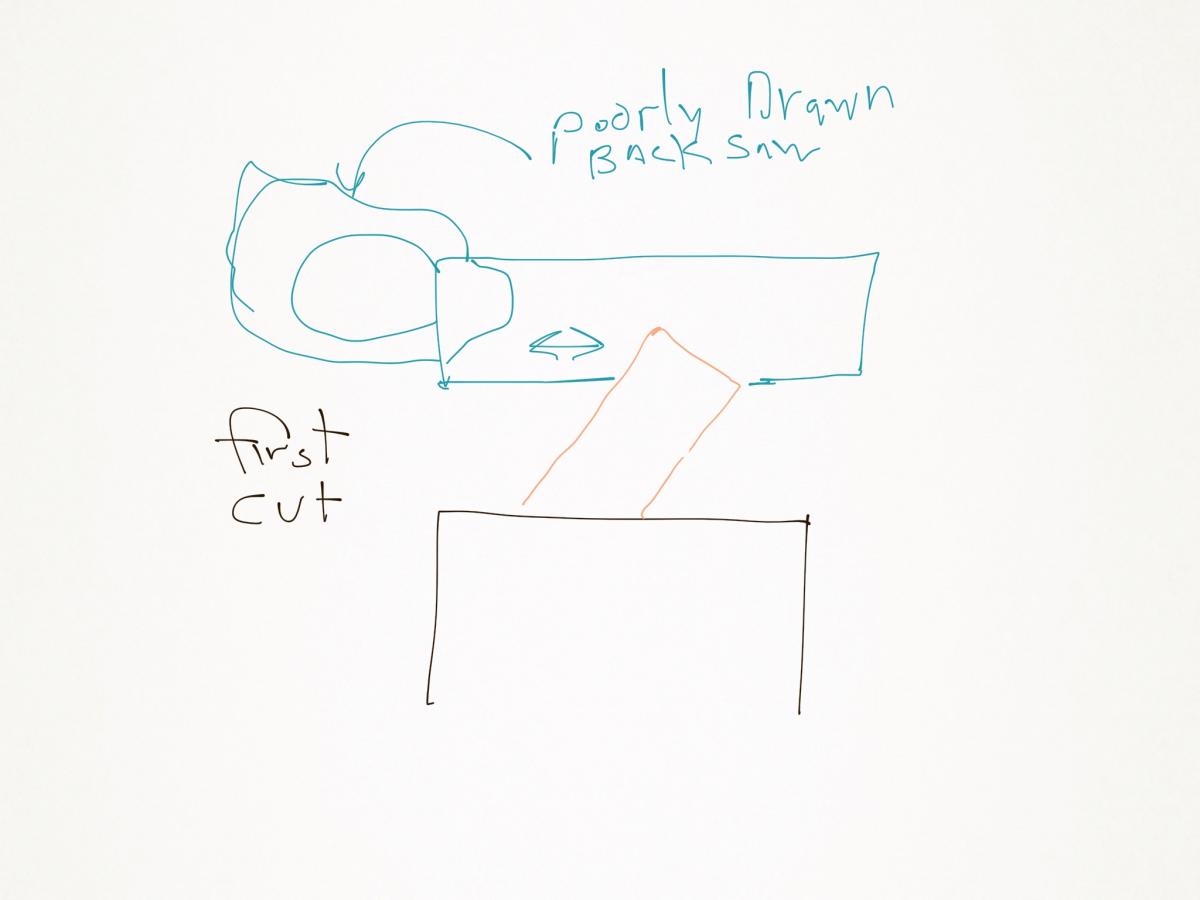
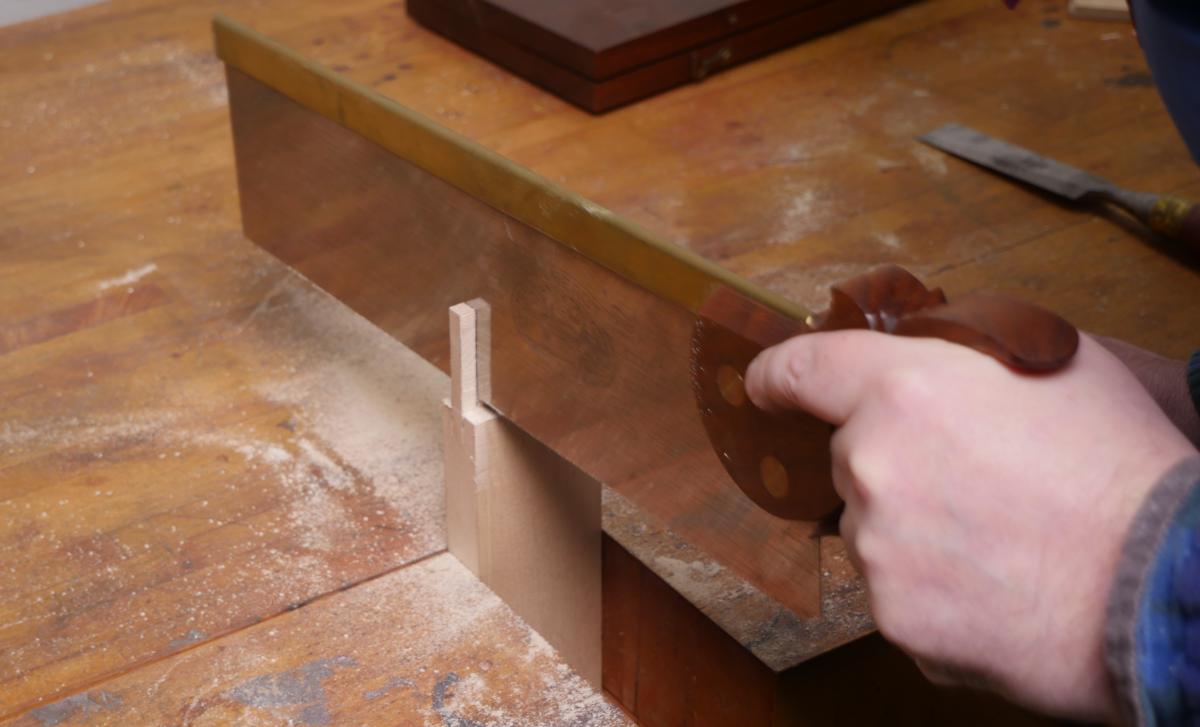
The basic concept of sawing the tenons is pretty simple. I have written previously about sawing straight and my goal is to saw the tenons obliterating most of the scribe line. While there are a bunch of ways to do this, what I do is clamp the rail at forty five degrees in my tail vise. You can also do this in a face vise but I love my tail vise. Then, with both the top and and sides in view at the same time, it's quick work with a sharp saw (in this case my Gramercy Tools Sash Saw) to saw a diagonal line from the end of the stile in the back to the shoulder line in the front. I am paying a lot of attention to ensure the saw is cutting where I want it to, and that I am not sawing past the shoulder line. While I saw I look over the end of the rail to make sure I am on track. If I am not, I can apply pressure on the saw to change tracking slightly, or ease a saw kerf to the line. If you are doing this for the first time, I would suggest practicing to get familiar with your saw and cutting straight. The operation is basically a ripping cut and any saw except one filed purely crosscut will do fine.
After sawing diagonally on the first cut I turned the wood around, tilted it the other way and sawed diagonally in the other direction. My first diagonal cut really helps the saw track properly.
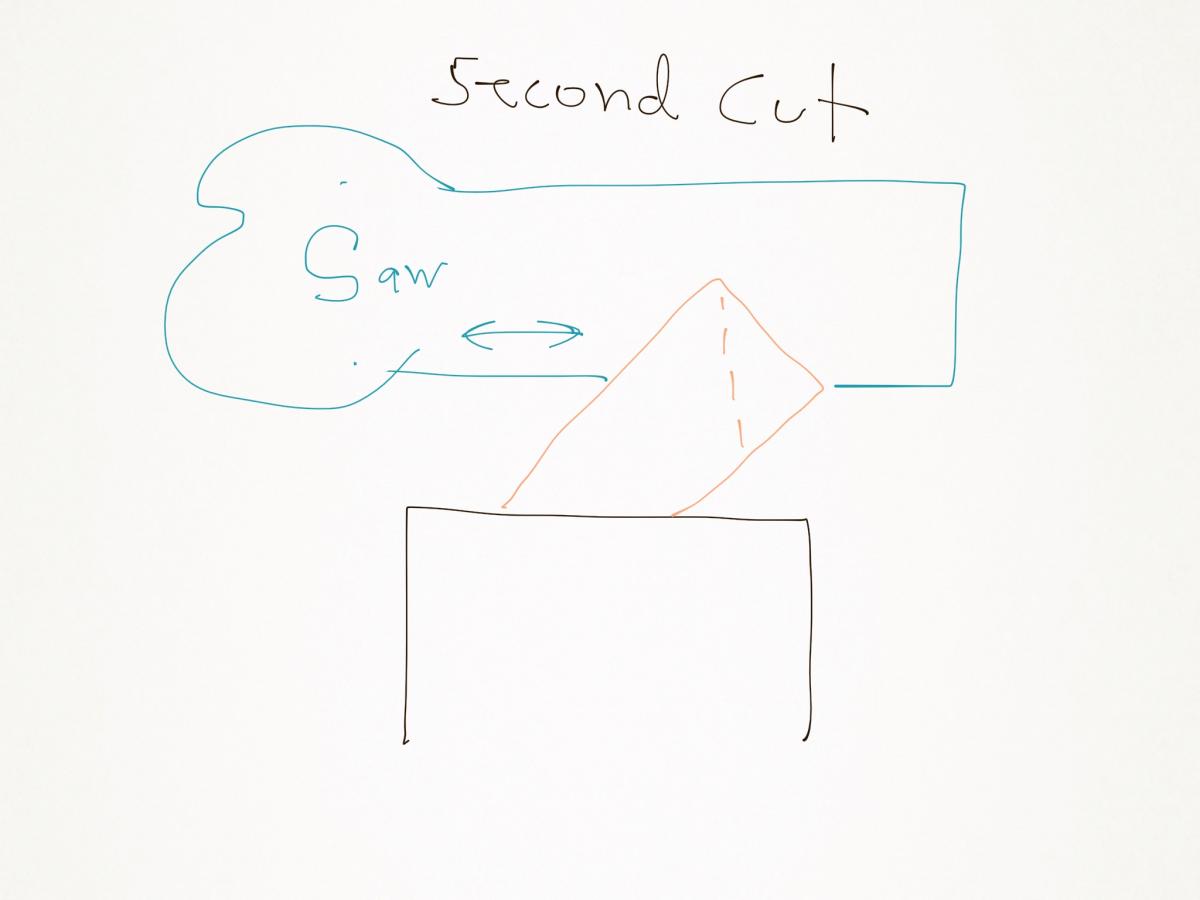
Then with the rail vertical, I saw straight done to the middle. As on the last cut the existing diagonal cuts once again do a great job of keeping the saw on the straight and narrow, but I have to be vigilant in checking both sides of the tenon to ensure I don't overshoot the shoulder line. You might find yourself with a little belly in the center of the joint that cannot be easily sawn away without damaging the shoulders. Ignore the belly for now.
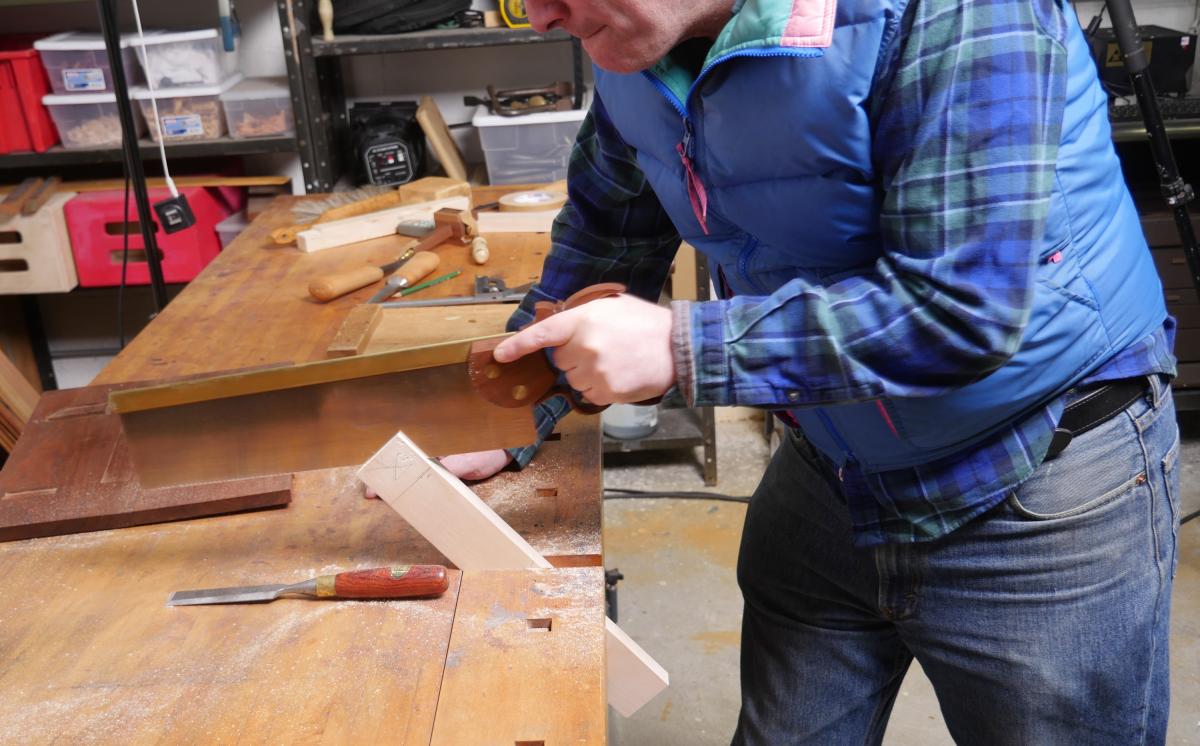 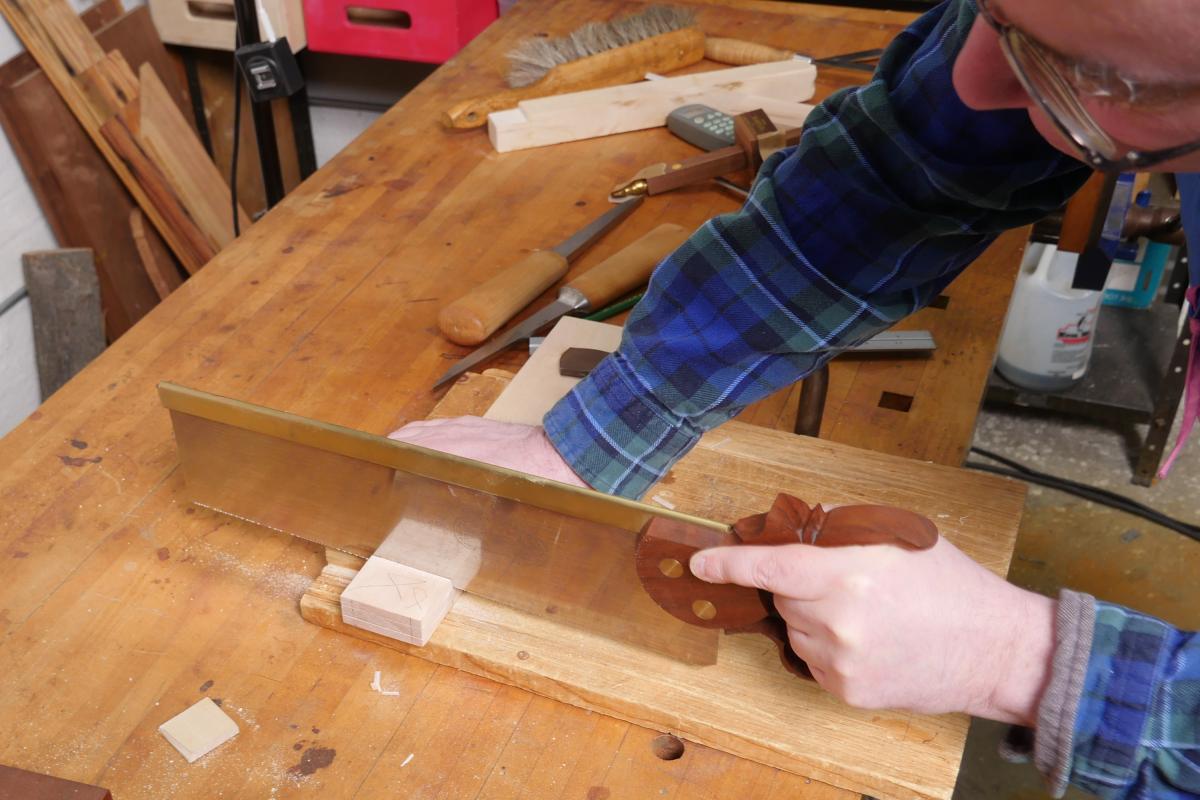
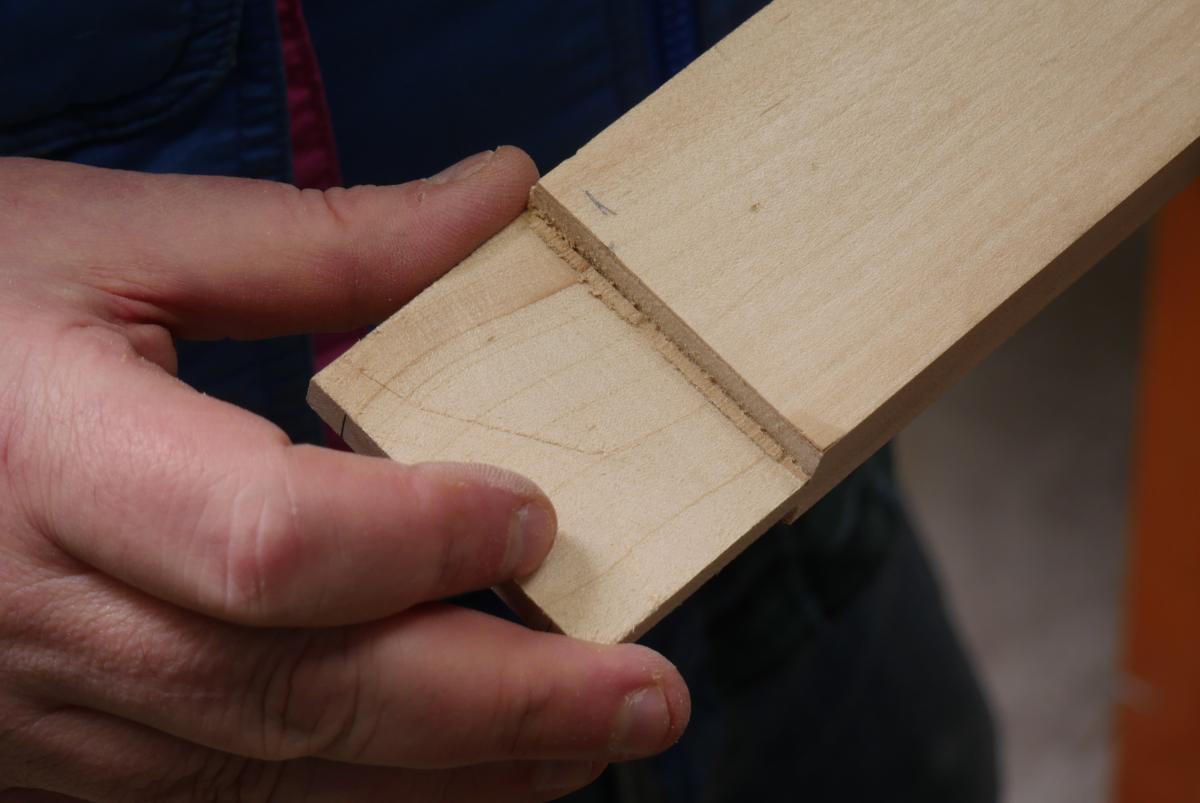 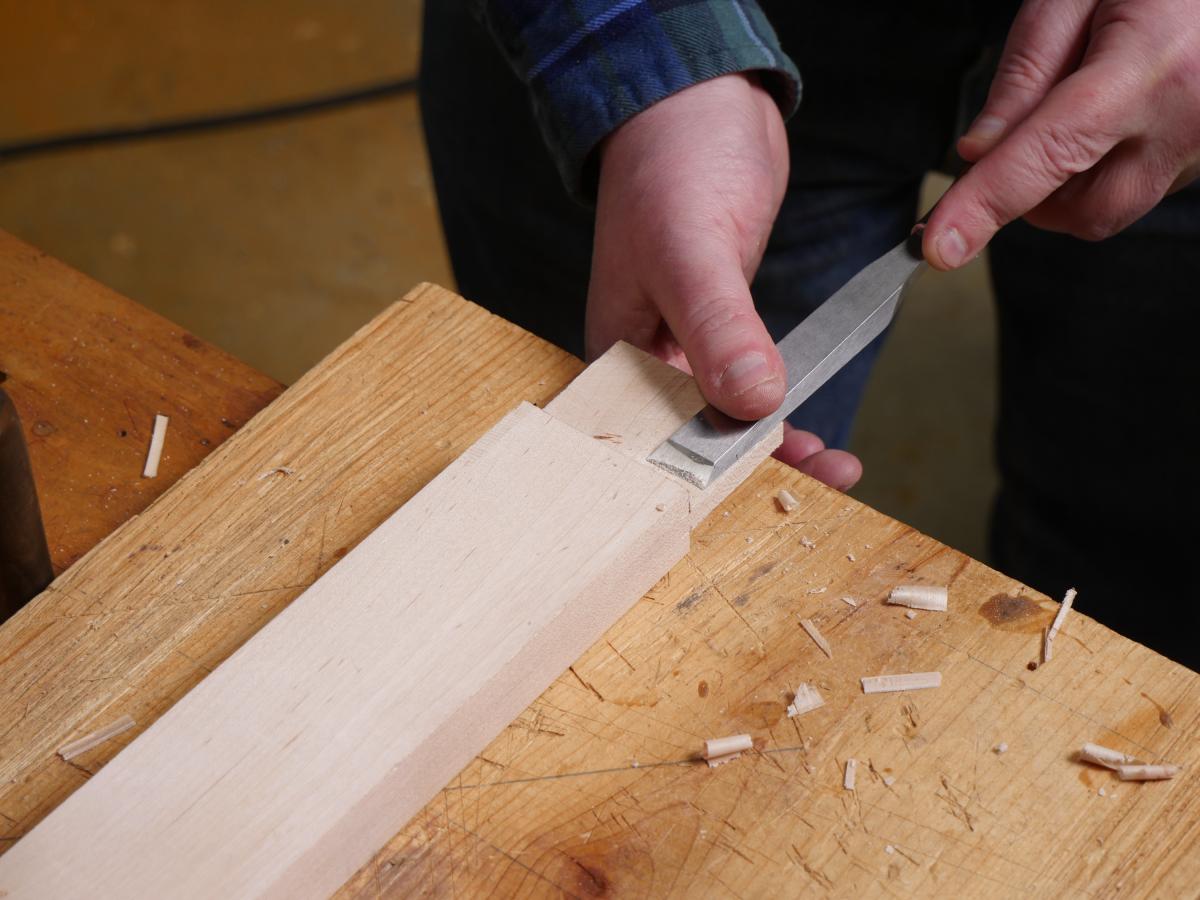
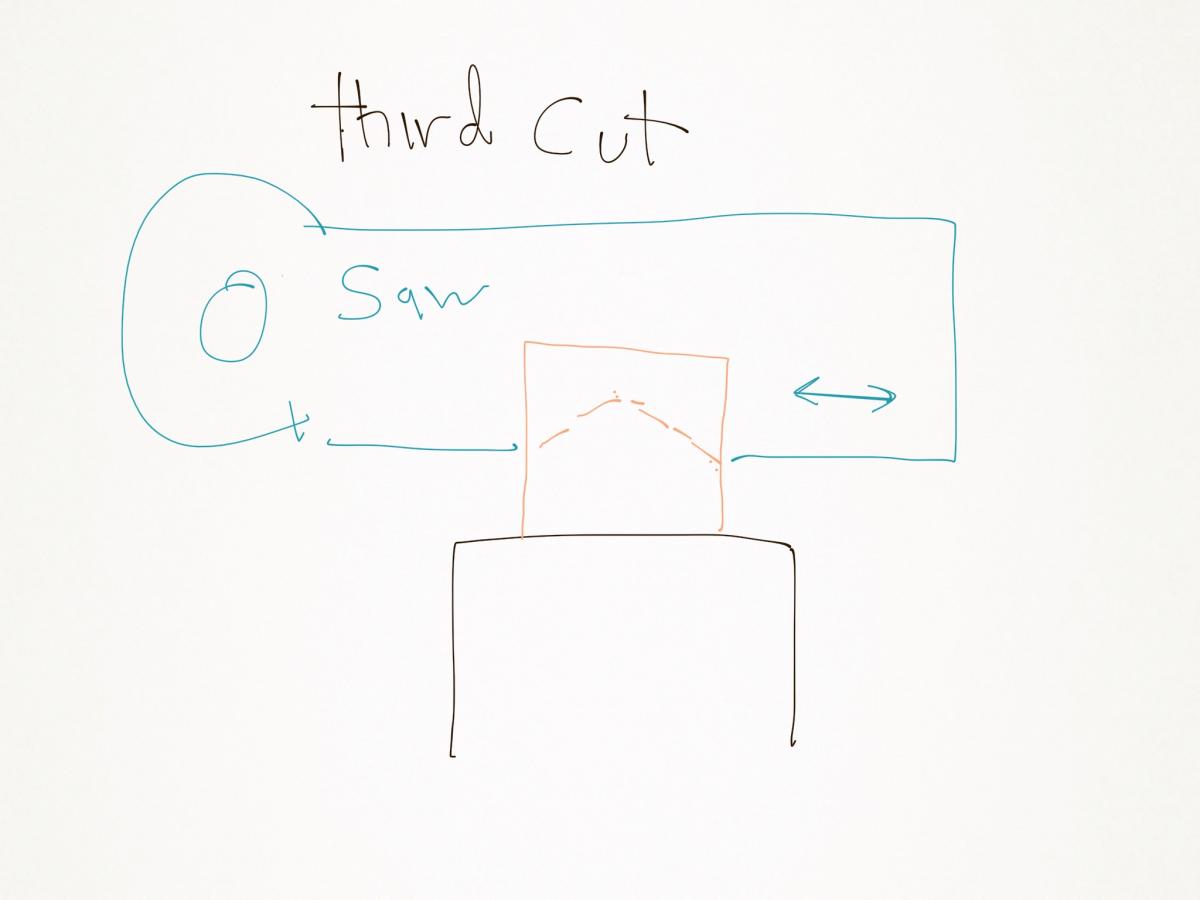
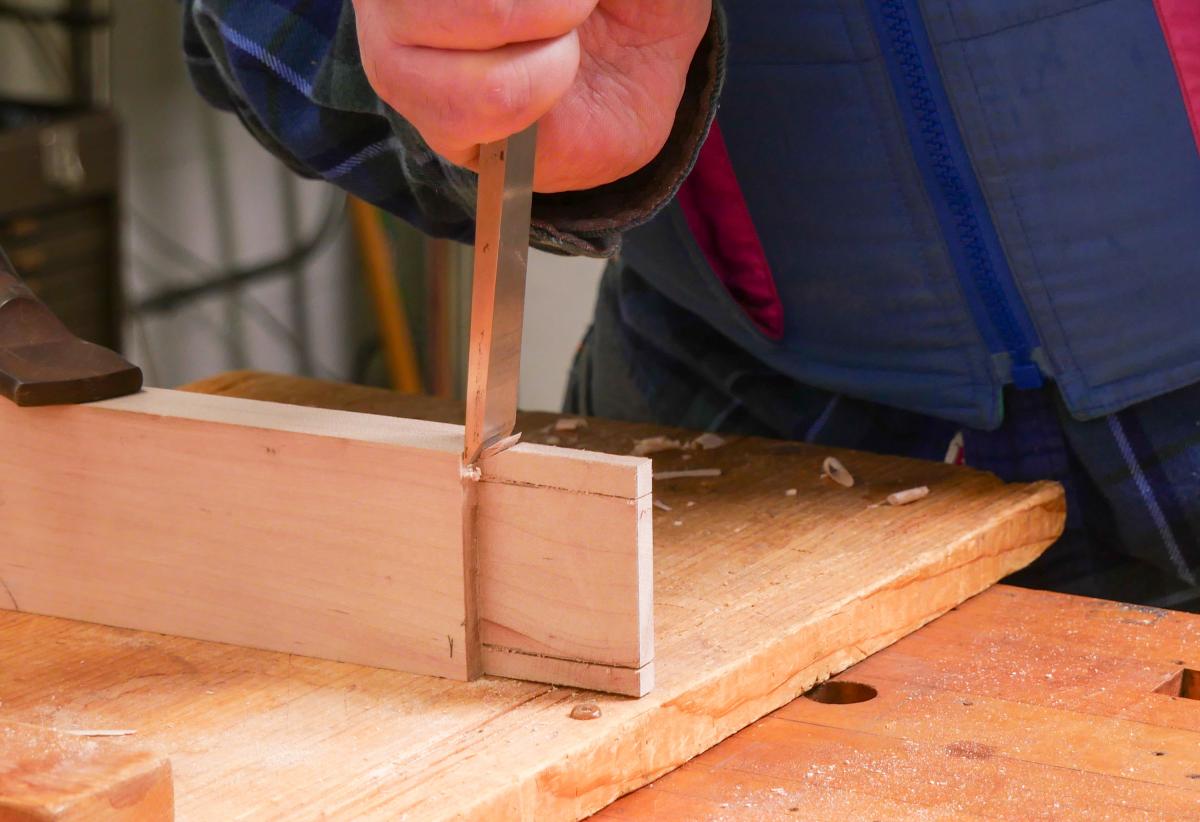
With the vertical cuts done, I go to a bench stop to saw the cheeks off. I want nice clean lines. Even with a sharp saw I get nervous so I very gently chop a shallow cut at the shoulder line. First light cuts at the scribe line with a wide chisel, then angled cuts from the waste to the scribe line, popping out a small "v" of wood. It's dead easy. Then I just saw the waste tenon cheek free. The most important thing is to pay attention so you don't forget to stop at the tenon. Chances are that even when you think you are done the cheeks won't pop out because of a little belly of wood left over from the saw cuts. Most of the time a little pulling on the waste frees it. Sometime I do have to go back with a saw (being careful not to get carried away). Any schmutz left by the cheek is trivially removed with a couple of paring cuts on the face of the tenon.
 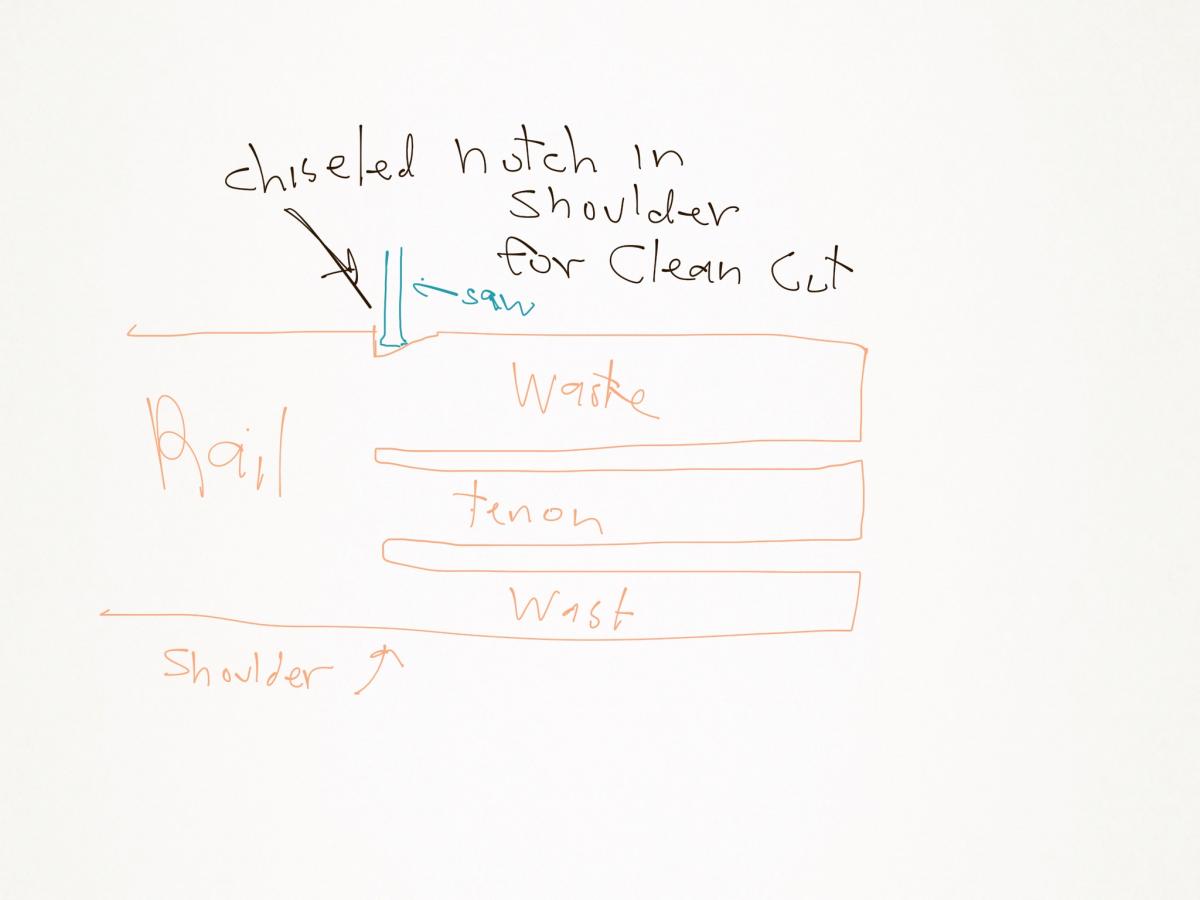
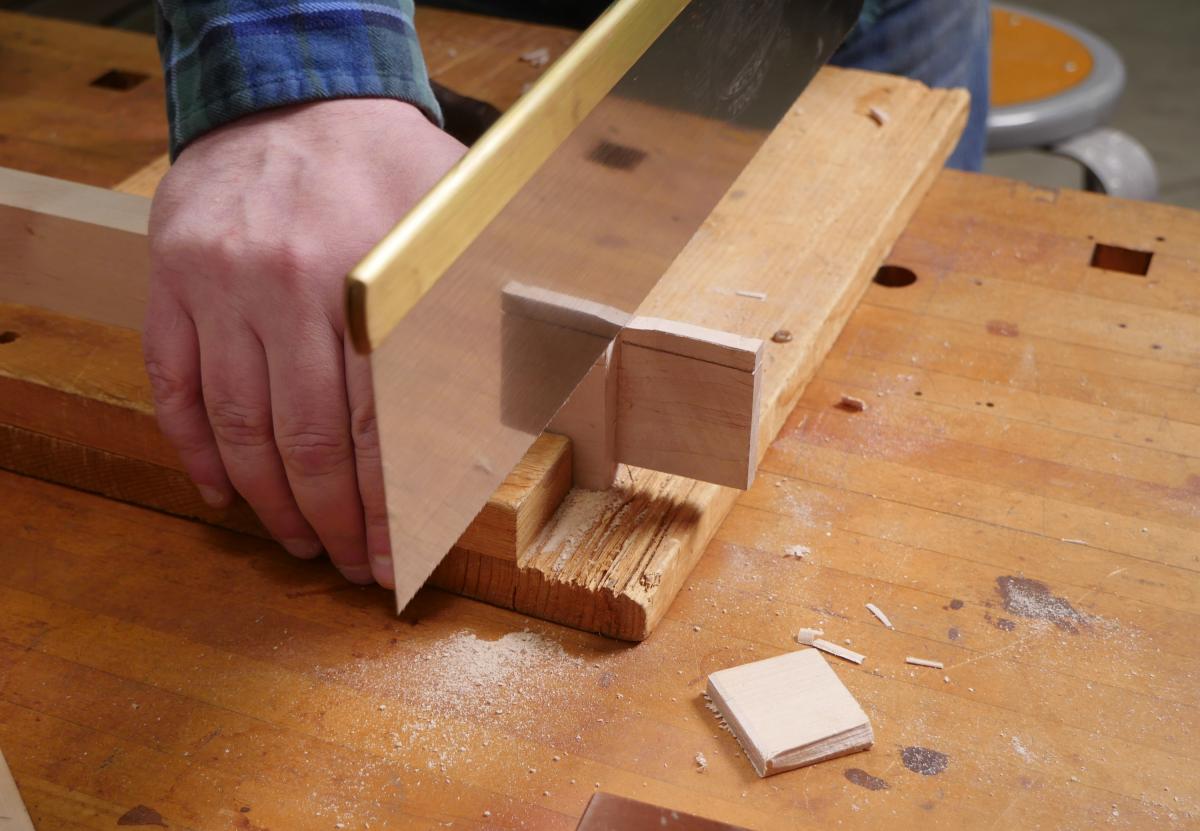
Finally, all we have to do is cut the tenon to length. I used a square to drop down saw lines from my original tenon layout. The typical proportion is that the tenon length is 3/4 of the height of the rail. In my case I am splitting the 1/4 shoulder space 1/2 on each side. I cut straight down but not all the way. I am careful not to accidentally saw into the shoulders of the rail. That would look very ugly, so I stop a little proud. Then I saw most of the waste tenon away. Using a chisel narrower than the width of the rail, so I don't damage the shoulders, I then chisel out the rest to a clean line. End grain has very little glue strength, so I typically try to undercut the shoulder a little so I know I will be tight at the visible edge.
With the tenon done, I am ready, in Part 2, to lay out and chop the mortise.
NB Incidentally, while it has taken hours to write this entry, in real life - as long as you accurately lay out your lines and can saw pretty straight without panicking - cutting the tenon, shoulders is a matter of a few minutes.
| Join the conversation | |
| The opinions expressed in this blog are those of the blog's author and guests and in no way reflect the views of Tools for Working Wood. |
|


 Joel's Blog
 Built-It Blog
 Video Roundup
 Classes & Events
 Work Magazine
Cheers