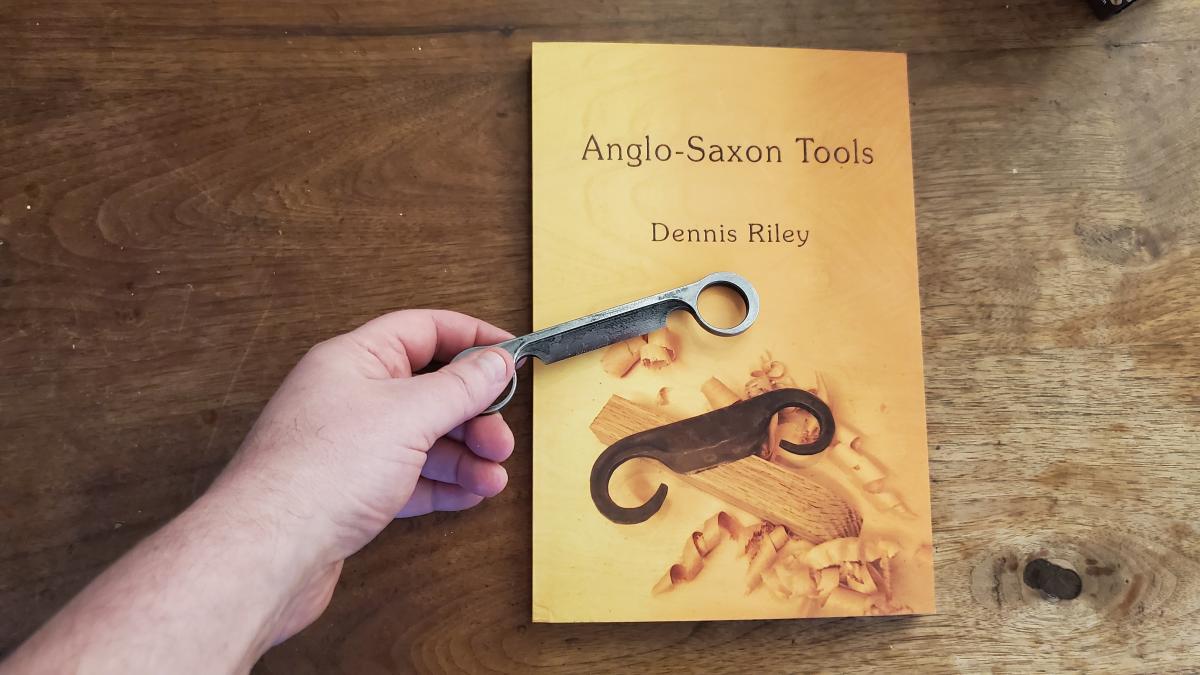
In January 2020 an image from the cover of a book “Saxon Tools” by Dennis Riley (below) circulated on the various social media sites. The image showed a reproduction of a small drawknife from about 700 AD whose tangs, instead of being straight and going into a handle, were curved and bent into a circle for grabbing. Around the world a few people started making them for personal use. I searched and inquired, but I could not find any photo of the original artifact. My thought was that the original was a full sized shave that might have broken and then was modified (to keep it useful) by removing the handles and bending the tangs in. All the copies of the Saxon shave we saw maintained the original proportion and shape of a large drawknife. Without wooden handles, a drawknife becomes far more portable, which also might have been the motive. The original, being of full sized proportions, is really for general work and would not have the action of a tool designed for smaller projects.
The picture inspired some further thought. My background is engineering and tool design, and for years I have wanted something different in the drawknife department. I could understand what I didn't like about the existing shaves on the market, but I couldn't quite articulate what I would want to do differently. I believe that every design has antecedents, so if I were to design something "new" I would be building upon an existing design of some kind. As my old professor used to say about our homework, "I don't care if you copy, but copy with UNDERSTANDING." I wasn't yet at this point of understanding.
My copy of The Dictionary of Woodworking Tools has 38 different versions of the drawknife (which they call a "drawing knife) all for slightly different purposes and trades. This makes sense, as professionals want the optimal tool for their specific usage. While historic drawknives with small blades and standard sized handles are listed, there isn't anything in the book about something as small as the Saxon drawknife that started us off.
There are three main features that define how a shave works: the length of the blade, the width of the blade, and the angle of the handles. In addition, the thickness of the blade contributes to stiffness and how responsive the tool is.
The longer the blade, the larger the work you can do, and also it’s easier to do slicing cuts where you hold the blade askew. There is a certain amount of leverage with a long blade, which is good. The downsides of a longer blade are that it’s harder to sharpen, it's less portable, and it has to be robust (meaning thicker and wider) so that it doesn't bend. Another really useful feature of a large drawknife is that there is plenty of space for the hands and handles. Some of the shorter bladed drawknives had large offsets so there was handle clearance. This is handy, but not very useful for small work. The angle of drawknife's handles to the blade is very important, especially for shorter blades, because they can get in the way of the work. If the angle is weird you end up holding it awkwardly and the tool won’t be comfortable to use. This is a design problem that has never been solved (until now) simply because - depending on the operation- there really isn’t any ideal universal handle angle. Patented drawknives with adjustable handles do exist, but we are not aware that they are currently in production. The biggest problem with adjustable handle drawknives is that the mechanisms aren’t particularly robust or small. Their main advantage was that they fold up and take less space in the toolbox. They were never popular.
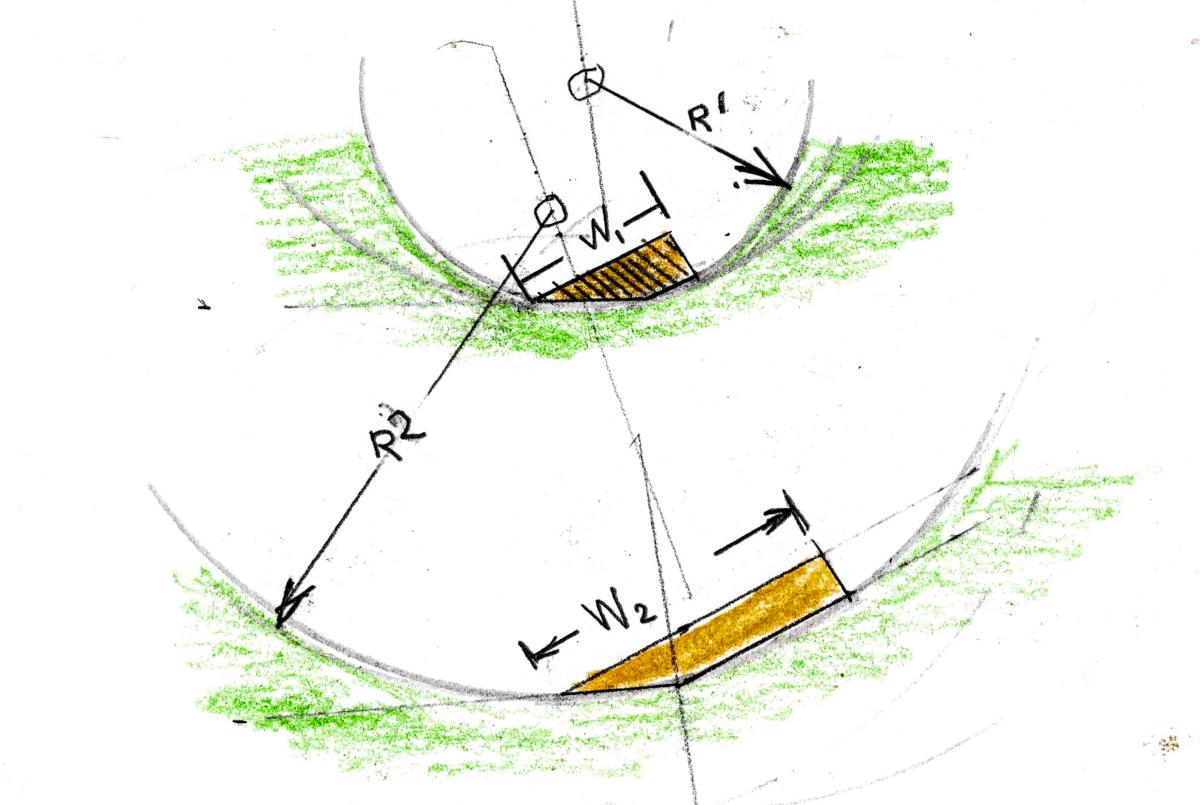
The width of the blade, that is, the distance from the cutting edge to the back, determines the action of the tool in how it follows contours, specifically concavities. The narrower the blade, the better it can dive into and pull out of a cut. As you can see in figure 1, the narrower drawknife (W1) can dive into a far tighter radius (R1) than a drawknife that is wider (W2 and R2). Of course the tool still needs to be stiff enough so it doesn’t bend. For spoon carving, a very narrow width really makes a difference. As spoon handles (these tools are most used on spoons) are rarely wide, a short cutting length is fine, but the shorter the cutting length increases the chances of traditional handles getting in the way.
Figure 1
Flexcut, a US based carving tool company, manufactures two small drawknives with fixed handles that are still bigger than our spoonmaker’s drawknife, but as they use sheet steel, there is a lot of flex in the blade, and the blade is rather wide. A thicker blade does make you feel that your effort is being transferred more positively and reliable to the cut, and you aren't fighting the tool.
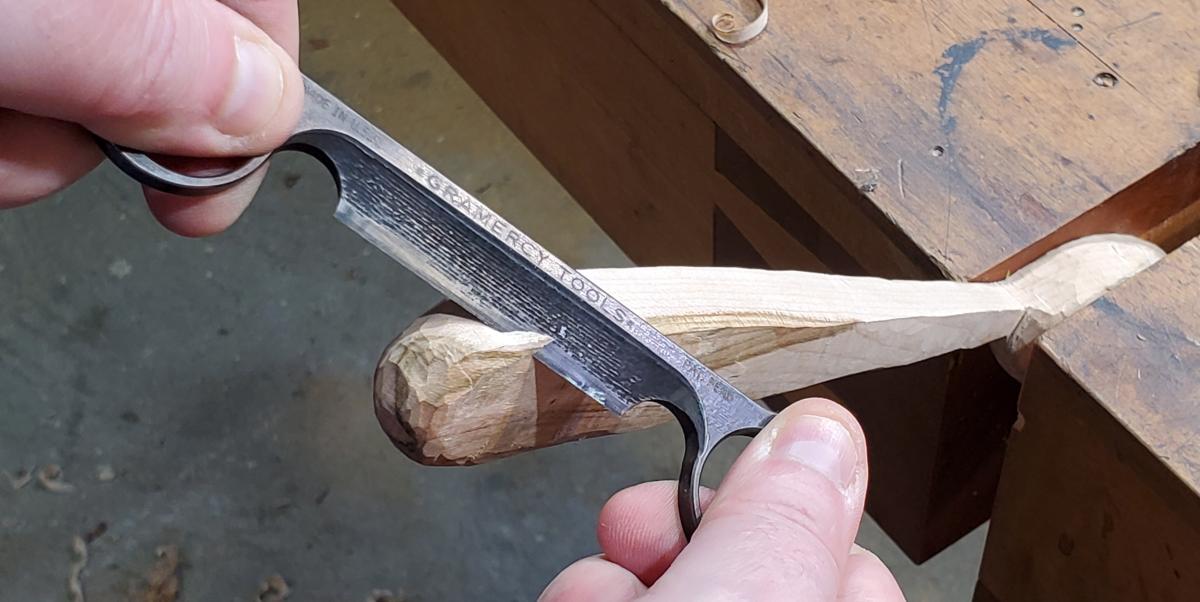
In 2019 we prototyped a moderate length drawknive with traditional extended handles. It was around 1/2" front to back. It solved the issue of action but the handles overwhelmed the tool and sometimes got in the way. Also there was the cost of handles to be factored in. It was while I was contemplating handles that we first saw the Saxon shave. The Saxon shave seemed perfect for spoon carving as long as we made the blade narrow enough for good action. By not having handles, the drawknife could be held any orientation. (You don’t actually stick a finger in the thumb holes and pull; that’s uncomfortable (see photo at the end of this page). The original bent tanged circles are elegant, but there is flex in the tang, and at certain angles your fingers can catch in the gap. The tang needs to be thick enough to resist bending or breaking. Our design uses a thin continuous closed circle.
The most comfortable way of holding the tool is by placing your thumbs over each circular hole, and bending your index finger underneath the hole and squeezing the circles. The circular holes are large enough to give the right amount of interference without slipping so that you can pull on the tool easily. The thickness of the material is an excellent compromise between blade stiffness and grasping comfort without fatigue. As you can grab the circles in any orientation, the tool is comfortable to use for any operation - pushing or pulling.
Kris, the principal designer on the project, took over at this point and had to solve two main questions: the optimal design of the drawknife and how to make them in production. Kris also had the great idea that circular handle holes would make it easy to add an accessory handle to register at any angle. The large diameter of the circular holes also means that the accessory handles have a large point of contact circle and clamp rigidly with little effort. We prototyped a few handles but we thought that we needed to get the tool out first. The holes also help with fixturing in manufacture.
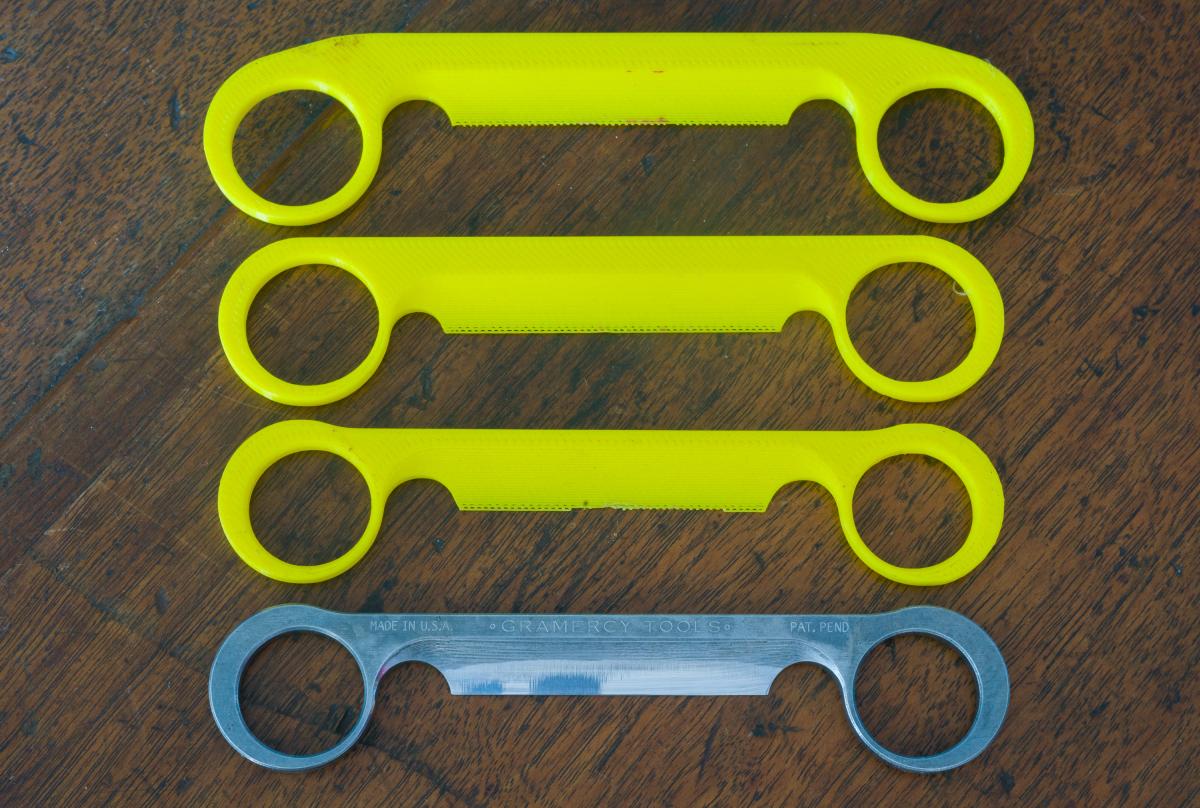
In early 2020 we drew up the design and 3D printed a few (see main picture). The early feedback was great and we found out that if you are careful, 3D printed PLA plastic can cut basswood. The 3D printing initially helped us get an elegant design. Then in the last incarnation of protoypes we shifted the blade back in relation to the handles so that this naturally puts your grip forward towards the blade center, which makes the tool easier to control and still maintains the narrow blade width. This shift goes along with the idea that a narrow width makes great action for carving and spoons - unlike the much larger, rougher work for which drawknives are typically used. These last changes were a perfect use of the 3D printed models. Another thing we learned from the plastic prototypes was that my original idea of 1/8" thick material was too thin - it didn't feel right in the hand. The final design is 3/16" thick and this made all the difference in the way it feels and the feedback it gives to the hand.
In the picture above the image at the back was our first shot at the design. It's missing a certain elegance and the balance is wrong. In the next prototype we straightened out the back and moved the cutting edge to the centerline of the finger holes. This cleaned up the look somewhat, but more importantly, it got the balance right. In the final prototype, we narrowed the blade from the back, and that not only gives us more action in diving into concavities, it really looks a lot better. The next step was steel, and the bottom shave is production. But what you can see in the prototyping and the history is that the design didn't come from outer space. We got an initial idea from a photo, figured out what features that this type of design would enable, and then used prototypes to finetune the depth and balance to reach the design potential.
The narrow blade width, the handle offset, closed circular handle holes are features we have not seen in any copies of the original tool. We think our tool length is also the shortest of what we have seen.
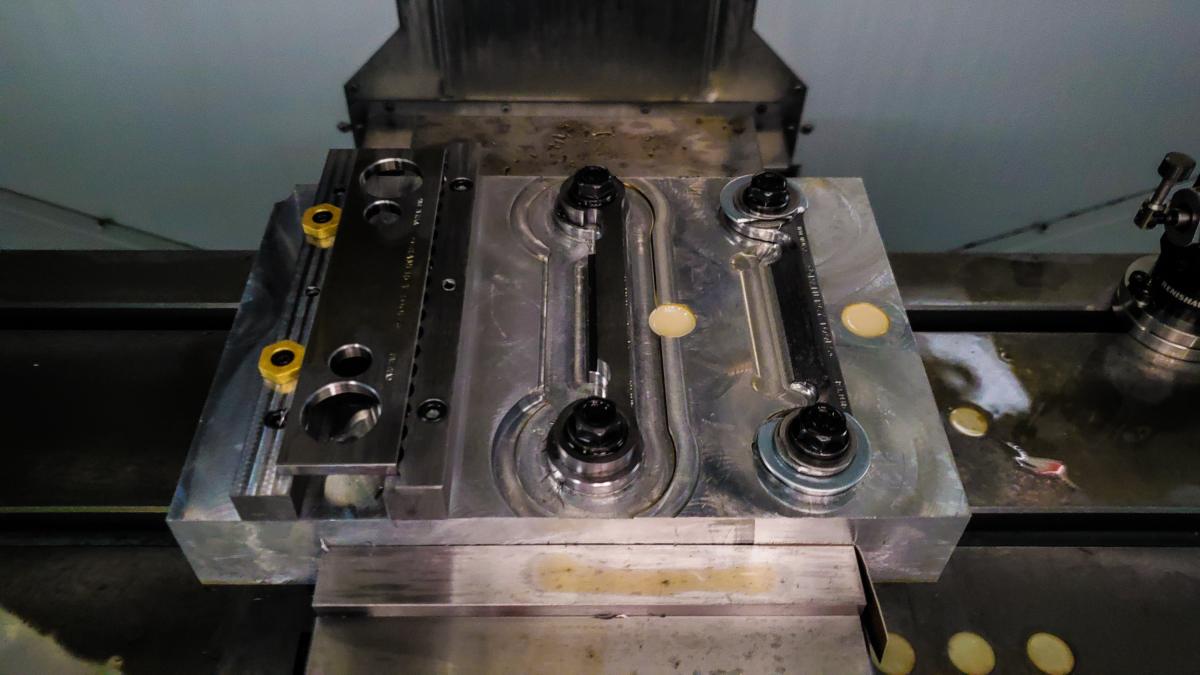
We finalized the design in February 2020, and after receiving a few quotes, decided to manufacture the product in-house. Then the pandemic hit and manufacturing was shut for three months. We resumed manufacturing design in Mid-June. We are machining this tool on our CNC mill for which we built a three stage fixture. This picture is of a test fixture. The production fixture is the same, but has space for four shaves in each stage. We also had to design and build heat-treating and grinding fixtures so that we can ship the tool sharp and ready to use. The initial manufacturing fixture. 1: machine the holes; 2: machine the profile; 3: do the bevel and engraving
This adventure built a lot on our previous trials making spoon bits. We selected O1 steel, a fairly straightforward oil hardening steel for which (if you follow instructions for a fairly long soak time) you can get - and we are getting - spectacular results. The shaves we ship not only come with a razor sharp edge, but also (due to the hardening process) the edge lasts a long time. The big issue with hardening is quenching the tool. We remove the knives from the kiln all aglow and then we have to quench them horizontally so any warp happens evenly. Because of the bevel we get a slight concavity to the bottom which makes sharpening easier. The idea of using a natural feature of metal movement during hardening to make the final tool easier to sharpen is something I learned from Ray Iles.
There happen to be enough unique aspects of the design so that we decided to get a design patent for the drawknife. We are not patenting the concept of a drawknife that we didn't invent, but the closed circle handle shape is unique and we want to protect it.
Since the tool was introduced in Fall 2020 it has proven really popular, has gotten great reviews, and is something we are all pretty proud of. For more details and a video of the tool click here.
The book that inspired it all
In use
Join the conversation
10/19/2022 Meryl Logue
This is a fantastic story. I will be purchasing one, EVEN THOUGH I don’t have an immediate use case. However, I am planning to use it when shaping repaired plane totes, and a leg-handle for the incredible TFWW saw vise I bought for the mess of old saws I’ve accumulated over the years.
Thank you all! It’s a lovely read and a very cool tool, and this article really helps us to see the value.
10/19/2022 Andy Lockhart
Good morning. Great blog today. I wonder if you could elaborate on one sentence-. We selected O1 steel, a fairly straightforward oil hardening steel for which (if you follow instructions for a fairly long soak time) you can get - and we are getting - spectacular results.
The reason I ask is: in the summer I took a Claire Minihan build a travisher course at the Port Townsend Wood school, and I plan to make some more. I have shaped some blades from O1 steel and am looking around for someone with a forge. I'd like to know more about what you mean by a fairly long soak time, and I got the impression that the way the piece enters the oil has some influence on warping. Is there a reference you can point me to? Thanks.
10/20/2022 Danny Roberts
Hello, are you aware that Riley, under the name of Daegrad Tools of Sheffield, England, made some of the tools in the book for sale, including a version of this, in Sheffield a few years ago, mostly for the benefit of re-enactors (Vikings et al). I believe I have one somewhere - works well.


 Joel's Blog
 Built-It Blog
 Video Roundup
 Classes & Events
 Work Magazine
Thank you all! It’s a lovely read and a very cool tool, and this article really helps us to see the value.
The reason I ask is: in the summer I took a Claire Minihan build a travisher course at the Port Townsend Wood school, and I plan to make some more. I have shaped some blades from O1 steel and am looking around for someone with a forge. I'd like to know more about what you mean by a fairly long soak time, and I got the impression that the way the piece enters the oil has some influence on warping. Is there a reference you can point me to? Thanks.
No I was not. Thank's for the information.
I don't remember where we got the sequence but it is pretty well documented.
Preheat:
Ramp full speed to 1200° F
Hold 15 minutes.
Harden:
Ramp full speed to 1550° F:
Hold 30 minutes
Quench @ 150° F in heated quench oil
Wash with soapy water to remove excess oil
Temper @ 350° F for 2 hours.